Install G'MIC for GIMP 3: Windows, Linux and Mac
Match G'MIC-Qt to your GIMP version and installation. Use the Windows installer or Linux extension, then check Filters; Mac packages need care.

Install the G'MIC-Qt plug-in built for your GIMP version and system, restart that copy of GIMP, then open Filters > G'MIC-Qt.... On Windows, use the GIMP 3 installer; for GIMP from Flathub, use its G'MIC extension. On Mac, the available package-manager tools have different roles: neither Homebrew's gmic command nor the MacPorts GIMP 2 plug-in is a drop-in addition to the GIMP 3 app.
I'd start with the matching packaged route because it keeps the host interface and required libraries together. Once the window opens, verify a small edit and its exported result before making G'MIC part of an important project. A successful download alone doesn't establish a working installation.
Choose the route for the GIMP you launch
| Your installation | Use this route |
|---|---|
| Windows, GIMP 3.2 | GIMP 3 Windows installer or complete ZIP package. Check the destination and architecture. |
| Linux, GIMP from Flathub | G'MIC Flatpak extension, with the correct branch and installation scope. |
| Linux, distribution package | A matching native plug-in package; check its GIMP dependency and distribution release. |
| Linux, GIMP from Snap Store | G'MIC content package for the GIMP snap. Reopen that application after adding it. |
| Linux, AppImage | Use a compatible native plug-in and check its libraries. A Flatpak extension belongs to the Flatpak application. |
| macOS, GIMP 3 app | Check the Mac limitations. The CLI, standalone app and GIMP plug-in are separate interfaces. |
The G'MIC download page separates GIMP 3, GIMP 2.10 and other hosts. It lists stable G'MIC 4.0.7 with Windows packages targeting GIMP 3.2. The Windows files are labelled gmic_4.0.7_gimp3.2_win64. G'MIC's own version number doesn't need to match GIMP's. The host target, operating system, architecture and required libraries must match.
Before installing, record the full version in About GIMP and whether you used gimp.org, the Microsoft Store, a Linux repository, Flatpak, Snap, AppImage or a Mac package manager. If you have several copies, identify the one you intend to keep using. Don't download the Photoshop-compatible .8bf package or the Paint.NET version for this job.
GIMP 3 changed its plug-in API, so moving a GIMP 2 binary into a GIMP 3 folder doesn't make it compatible. Likewise, a win64 label doesn't establish support for a native ARM64 GIMP build. Follow the package's stated architecture instead of guessing from the operating system alone.
Windows: install into the folder your GIMP reads
- Open Edit > Preferences > Folders > Plug-ins in the intended GIMP. Note its personal plug-ins folder. The folder preferences distinguish personal and system resources; use the personal location for your addition.
- Save open work and quit GIMP. On the project download page, choose the stable .exe installer under G'MIC-Qt plug-in for GIMP 3.
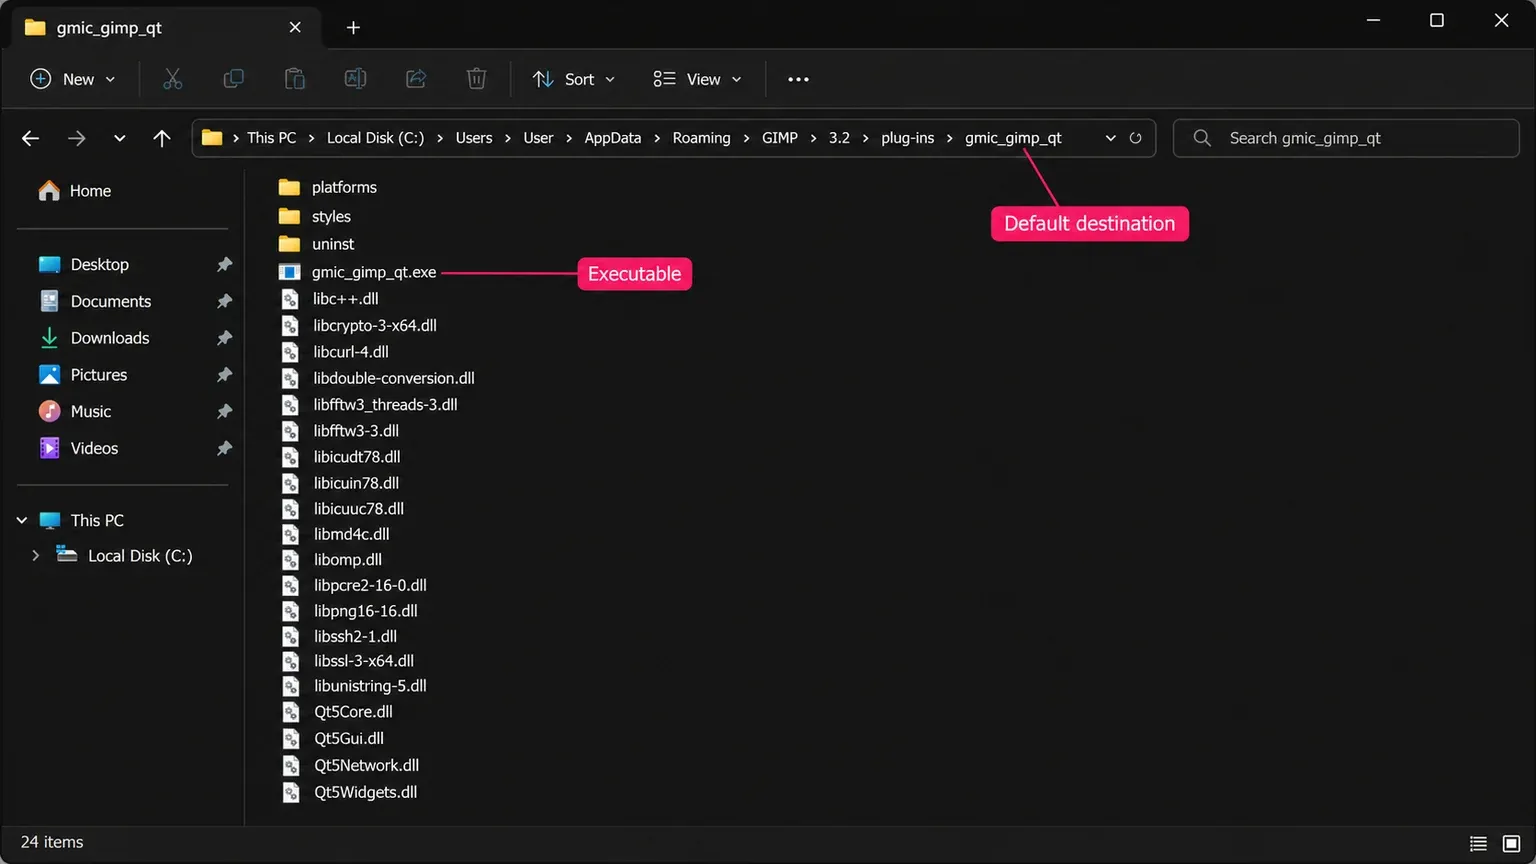
- Run the installer and inspect its destination. The GIMP 3.2 installer script defaults to
%APPDATA%\GIMP\3.2\plug-ins\gmic_gimp_qt, but can reuse a previous installation directory. Compare it with the folder you just checked, including for a Microsoft Store copy. - Complete installation, restart the same GIMP and open an RGB or greyscale image.
- Choose Filters > G'MIC-Qt.... A working installation opens G'MIC's own filter window. Continue with the first-edit check.
The whole package matters. The installer includes the executable, Qt platform files and companion libraries. Copying only gmic_gimp_qt.exe can leave the required files behind. Don't download individual DLLs from unrelated sites to patch an incomplete installation.
If you use the ZIP from the same GIMP 3 section, extract it and place the complete gmic_gimp_qt folder in the personal plug-ins location. The executable should sit inside its matching folder:
plug-ins\gmic_gimp_qt\gmic_gimp_qt.exeAvoid an extra archive-name folder between plug-ins and gmic_gimp_qt. GIMP's installation guidance requires the plug-in's own matching subfolder. Restart after changing that layout. If an installer and a manual copy have left two versions in different search folders, record both locations and keep the intended one; the general plug-in guide explains folder and version conflicts.
Linux Flatpak: match the scope and extension branch
The official G'MIC page offers org.gimp.GIMP.Plugin.GMic for the Flathub GIMP. First check where that GIMP is installed:
flatpak list --app --columns=application,installationFind org.gimp.GIMP. The list command shows user and system installations. If both exist, decide which you will launch before adding the extension. A menu shortcut can otherwise lead you back to the other copy.
For a user installation, use:
flatpak install --user flathub org.gimp.GIMP.Plugin.GMic//3For the default system installation, use:
flatpak install --system flathub org.gimp.GIMP.Plugin.GMic//3These commands assume the flathub remote is configured in that scope. The current extension manifest uses branch 3, with GIMP as its runtime; //3 selects that extension branch. GIMP itself may show stable, so the two branch labels aren't meant to be identical. Read the installation prompts and confirm the intended package.
The user and system scopes are separate installations. If you deliberately use an additional named system installation, use its matching --installation=NAME option instead of assuming --system selects it.
After installation, close GIMP completely. You can check the application and extension rows with:
flatpak list --columns=application,branch,installationThen launch the intended copy explicitly. For the user installation:
flatpak run --user org.gimp.GIMPUse --system in place of --user for the default system copy. The run command accepts these scope options. Open an RGB image and check Filters. Installing the extension doesn't add G'MIC to a separate AppImage, Snap or distribution build.
GIMP from Snap Store: add its G'MIC package
If you run the GIMP snap, use the G'MIC content package for that application. Save your work and close GIMP, then install the add-on:
sudo snap install gimp-plugins-gmicThe package recipe targets the GIMP 3 host and supplies the plug-in with its libraries. Reopen the GIMP snap and check Filters > G'MIC-Qt... on an RGB image. This package doesn't add a menu to a separate Flatpak, AppImage or native GIMP.
The maintainer also flags a profile-migration issue after older Snap installations are upgraded. If the menu is missing, follow the registration checks below and back up the profile and personal resources before following any reset instructions.
Native Linux and AppImage: check the libraries as well as the folder
For a distribution's own GIMP, use a G'MIC plug-in package built for that distribution and the installed GIMP generation. Read its dependencies before accepting a package-manager transaction. A package that pulls in GIMP 2 isn't a solution for the GIMP 3 application you already open.
The project provides GIMP 3 ZIP builds for Ubuntu 26.04 Resolute and Debian 13 Trixie. It lists older Ubuntu and Debian builds separately under GIMP 2.10. A matching distribution name in the wrong host section still gives you the wrong plug-in.
For a matching native ZIP, follow its instructions and use the personal folder shown by Edit > Preferences > Folders > Plug-ins. Keep the complete gmic_gimp_qt directory, with the same-named executable inside it. An AppImage can also depend on host libraries for an external plug-in; don't treat a standalone application package as a promise that every downloaded add-on is self-contained.
The UbuntuHandbook installation guide and its user reports show the relevant distinctions: folder nesting, missing GIMP libraries and Qt display errors can cause different failures. Its author reports a cross-release ZIP working in one setup; that isn't a guarantee for every Ubuntu or Mint release. I'd use the Flathub application and extension together if keeping a native build working would require a collection of unfamiliar library replacements.
If you need a source build, first confirm the build instructions target GIMP 3 and the libraries in your environment. The project's general source recipe still names libgimp2.0-dev; it isn't a GIMP 3 recipe merely because the current source archive is newer. Compiling and maintaining a custom build is a separate job. Keep your working editor until the replacement route has passed the checks below.
Mac: separate the command, standalone app and GIMP plug-in
G'MIC doesn't officially maintain a macOS build. Its MacPorts and Homebrew links appear under the GIMP 2.10 section, and the packages serve different purposes:
- Homebrew's
gmicformula supplies thegmicbinary, the command-line interface. It doesn't add a G'MIC-Qt entry to GIMP. - The MacPorts
gmic-gimpport depends ongimp2. It belongs to that GIMP 2 setup, rather than the GIMP 3 app downloaded from gimp.org. - MacPorts
gmic-qtis a separate graphical application. You open and use it outside GIMP.
For occasional filtering, I'd use the standalone graphical app alongside GIMP 3. Save the XCF, export a working copy in a format that preserves the colour and transparency you need, process it in the standalone app, then import the saved result as a layer in your GIMP project. Keep the original layer available and check alignment, dimensions, edges and colour. The file round trip doesn't carry GIMP's editable layer stack through the external filter.
If you require the integrated GIMP 3 plug-in, find a build explicitly made for your Mac architecture and GIMP package, or arrange a compatible build. The Windows and Linux binaries aren't substitutes. A package called "G'MIC" or a working Terminal command doesn't establish that integration.
Confirm registration before reinstalling
The GIMP host registers Filters > G'MIC-Qt... for RGB and greyscale images. There is one entry opening its filter window; individual effects live inside that window. Open a suitable image before judging a greyed-out command.
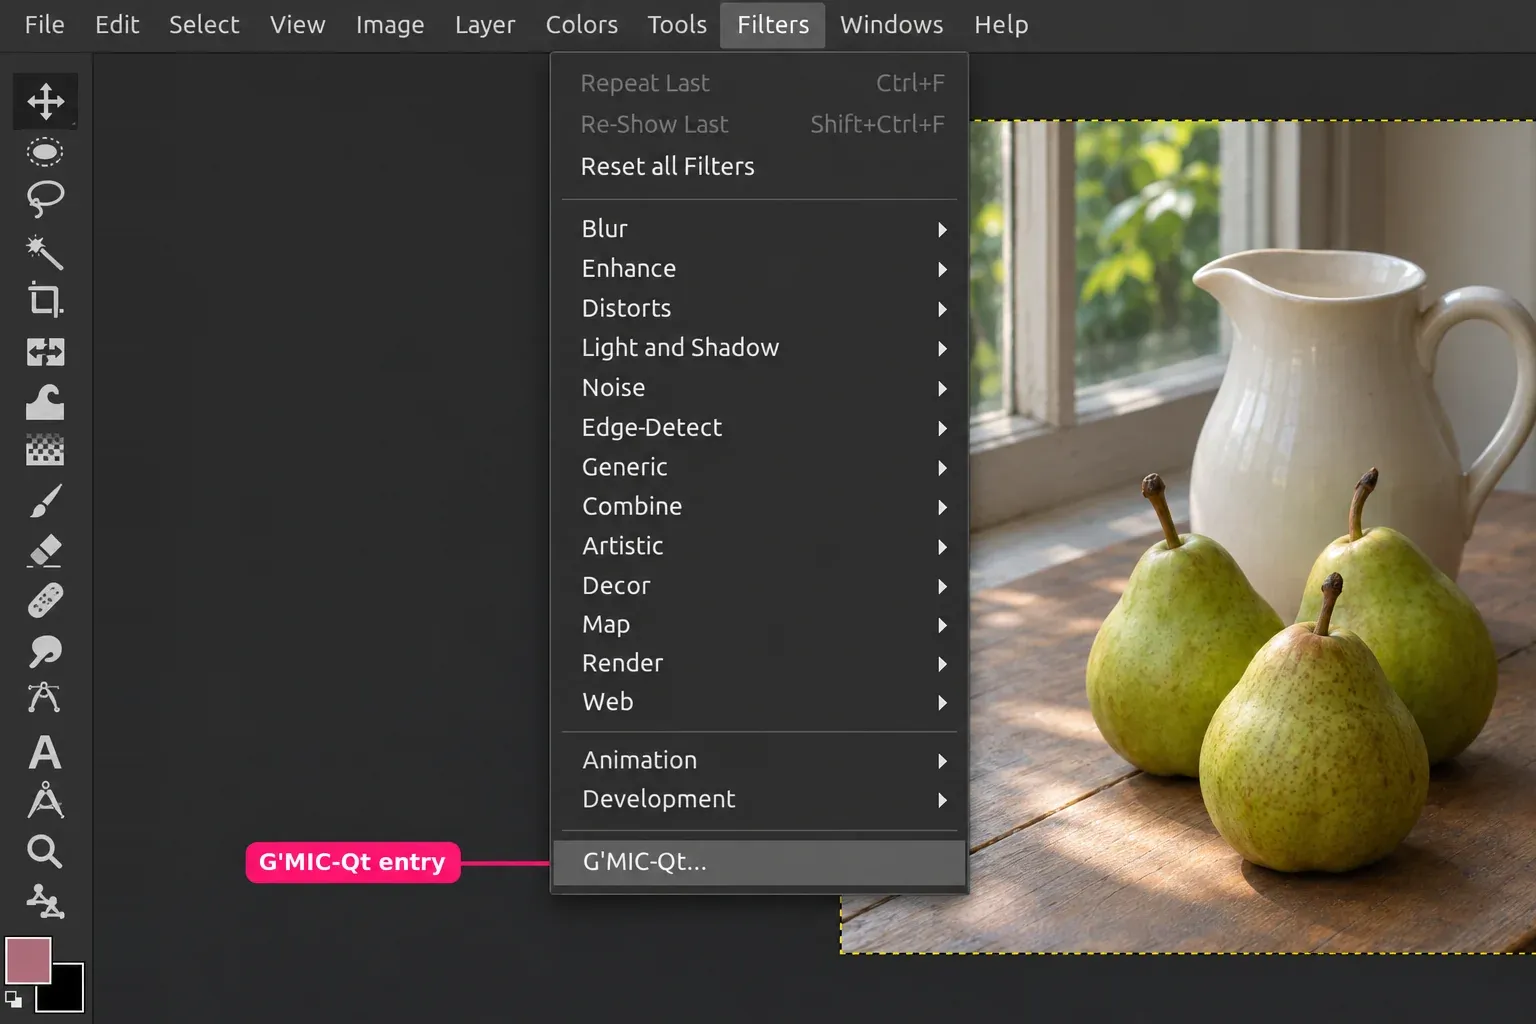
Press / and search for G'MIC if you can't find the menu entry. You can also search for gmic in Help > Plug-in Browser, which lists loaded plug-ins. A match confirms registration. The browser doesn't run the filter; use its menu or command search.
This distinction has a history. The GIMP 3 port's launch discussion recorded an installer using the wrong folder, a successful corrected installer and later filter-specific problems. Those were particular release-candidate setups. The useful diagnostic remains: first establish which package GIMP loaded, then investigate the operation that fails.
Verify one edit and the finished file
- Save the editable project as XCF. Select an ordinary photo layer, then use Layer > Duplicate Layers to make a working copy.
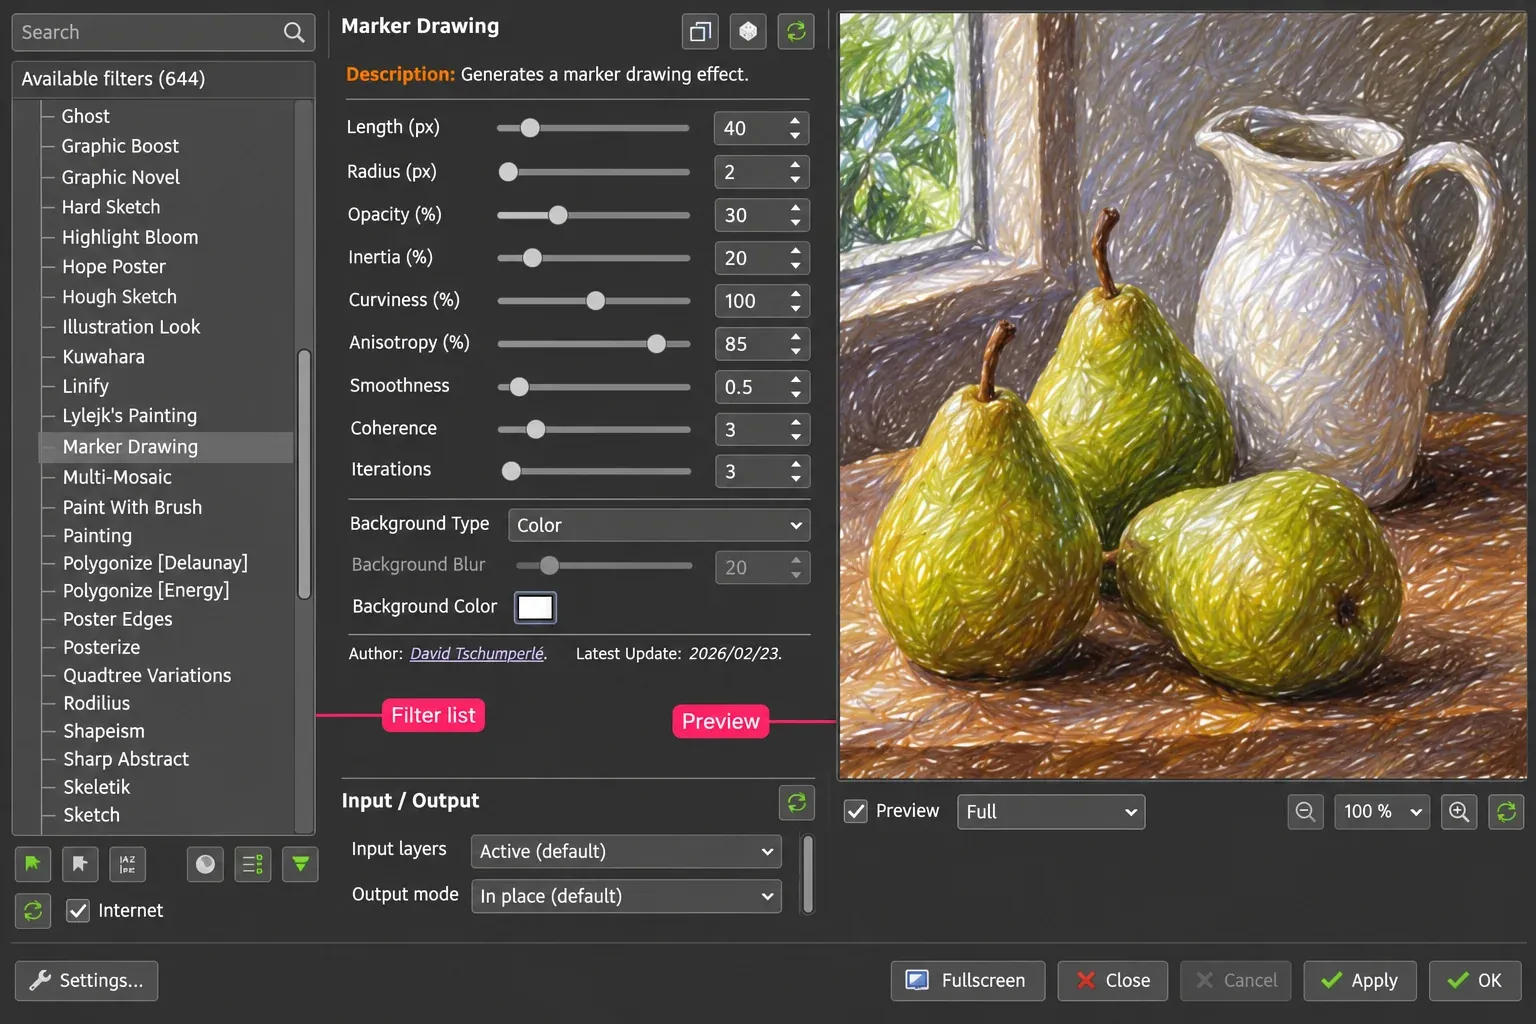
- Open Filters > G'MIC-Qt... and choose one filter with an obvious, modest effect. You are checking the complete path from input to output, rather than committing a whole photograph to an unfamiliar look.
- Inspect Input layers and Output mode. With Active (default) and In place (default), the selected layer is the input and the result is written back to it. Make sure that is your duplicate.
- Check the preview and use OK once to process the edit and close the window. Inspect the resulting layer in GIMP, including texture and edges at full size. Keep the original layer until you are satisfied.
- Save the XCF, export a separate delivery file, then reopen that export and check its appearance, dimensions and any required transparency. Save preserves the XCF project; Export makes the other image format.
The host's input and output modes determine which layers are read and changed. A preview of the wrong layer isn't an installation failure. Don't assume the applied result remains an adjustable GIMP effect: check the resulting layer structure and preserve the source.
Let G'MIC finish before editing the same image elsewhere in GIMP. The manual warns that plug-ins aren't informed of concurrent image edits, which can produce incorrect results or damage undo history.
Follow the symptom to the next check
- No command after restarting: verify the launched GIMP, host package, architecture and actual personal folder. For manual installs, check the matching subfolder and supporting files. For Flatpak, check installation scope and extension branch.
- Command is present but disabled: open an image and check its mode. For an indexed image, convert a working copy with Image > Mode > RGB. Reinstalling doesn't change the input mode.
- Registered, but the window crashes or never opens: keep the exact error and note the GIMP/G'MIC versions, OS, architecture and package sources. A missing library or Qt display error calls for that package's runtime guidance, not another arbitrary folder.
- The window opens, but one filter fails: record the filter name, settings, input/output modes and error. The port discussion records Color Presets needing an additional data file and an interactive filter requiring an X11 display. Check the filter's requirements before changing the entire installation.
- A new manual package disrupts GIMP startup: close GIMP and move only that newly added plug-in folder to a recoverable holding location outside its search paths. Restart and keep unrelated plug-ins and the rest of the profile intact.
If you update GIMP or G'MIC, repeat the same small edit and reopened-export check. Keep a record of the package source and working versions; a newer release doesn't remove the need to match the host. Once registration, processing and output all work, you have finished the installation. The GIMP 3 plug-in selection guide can help decide whether a different tool better suits the next task.

Elena Morris
Elena Morris is the GIMP image-editing and compositing editor at TheGIMP.net. She writes about selections, masks and layers, restrained retouching, compositing and export.