GIMP 3 plug-ins: which ones to choose and why
Choose Batcher for batches, G'MIC-Qt for filters or Resynthesizer for Heal Selection. Check the GIMP version, operating system and package before installing.

For GIMP 3, I'd choose Batcher for repeated exports, G'MIC-Qt for additional filters, or Resynthesizer for filling an object selection from nearby texture. Batcher is my first addition for repetitive work because it brings the input files, operations and output names into one workflow. For text styling, consider GEGL Effects after checking what GIMP already provides. Every choice needs a package that matches your GIMP version, operating system and installation method.
A download labelled "GIMP plug-in" isn't enough. GIMP 3 changed its plug-in API, so older GIMP 2 plug-ins need updating. Moving an old Python file into the new folder doesn't port it.
Choose the result you need first
| Your job | My choice and package check |
|---|---|
| Resize or convert a folder; export layers separately | Batcher. GIMP 3.2 needs Batcher 1.2.2 or later. Copy the complete package. |
| Add image-processing and artistic filters | G'MIC-Qt. Use its GIMP 3 host package, matched to your system and GIMP distribution. |
| Remove a small object against similar texture | Resynthesizer's Heal Selection. The engine and scripts are both required. Inspect the fill and its precision limits. |
| Build elaborate text or layer effects | GEGL Effects. Use the GEGL folder and all required companion binaries. |
| Automate one particular edit or export | A maintained GIMP 3 script. Read that script's purpose and installation notes; a collection may also contain unported files. |
There is useful evidence behind the first three choices. In a GIMP 3 users' discussion, editors report using Batcher, G'MIC-Qt and Resynthesizer, with concrete examples involving Debian and Flatpak. A separate Windows installation discussion records G'MIC loading while copied GIMP 2 scripts failed. The practical lesson is to identify the port and package, then check a representative edit. Those reports don't establish that one plug-in is faster or that every distribution works.
Match the download to your GIMP installation
Before downloading, note the full version shown in About GIMP and how you installed the application. A Windows installer, a Mac DMG, a Linux distribution package, Flatpak and AppImage can require different plug-in builds or locations. The manual's installation guidance also distinguishes prebuilt plug-ins from source code: an archive of source files isn't necessarily something you can copy into GIMP and run.
On Windows, begin with the maintainer's matching installer or complete binary folder. Check whether it targets GIMP 3 and the architecture of your GIMP build. Don't take a similarly named GIMP 2.10 package, a Photoshop .8bf plug-in or a Paint.NET package as a substitute. G'MIC's download page separates these hosts explicitly.
For macOS, Batcher documents a manual installation. G'MIC doesn't maintain an official Mac build; its MacPorts/Homebrew note is under the GIMP 2.10 section. That doesn't establish a drop-in package for the GIMP 3 DMG. Resynthesizer's upstream 3.0.1 release supplies no compiled assets either. I'd confirm a compatible Mac package before building a workflow around either tool.
Linux packages also need to match the GIMP installation. A host-system package isn't automatically an extension for Flatpak. G'MIC publishes a Flatpak route and specific Linux binaries; Resynthesizer has a GIMP Flatpak extension. Batcher documents manual routes for Flatpak and AppImage, while Snap is unsupported. Follow the chosen plug-in's instructions rather than applying one distribution command to every GIMP installation.
Batcher: start with a small, separate-output batch
Batcher converts image files, exports layers and processes open images. It suits resized delivery copies, a folder of format conversions, or a layered composition whose elements need individual files. Its current release is 1.2.10; GIMP 3.2 requires 1.2.2 or later. On Windows, GIMP 3.0.0-1 or later is required, with Python plug-in support enabled. The Microsoft Store build enables that support automatically.
Installation is manual. Copy the complete batcher folder from its ZIP to the plug-ins folder specified in its instructions, then restart GIMP. Keep batcher.py inside that folder with the supporting files. Copying the Python file alone leaves dependencies behind.
I'd begin with Batch Convert and a few representative copies. It makes an incorrect output path or unsuitable action visible before the same mistake reaches a whole folder.
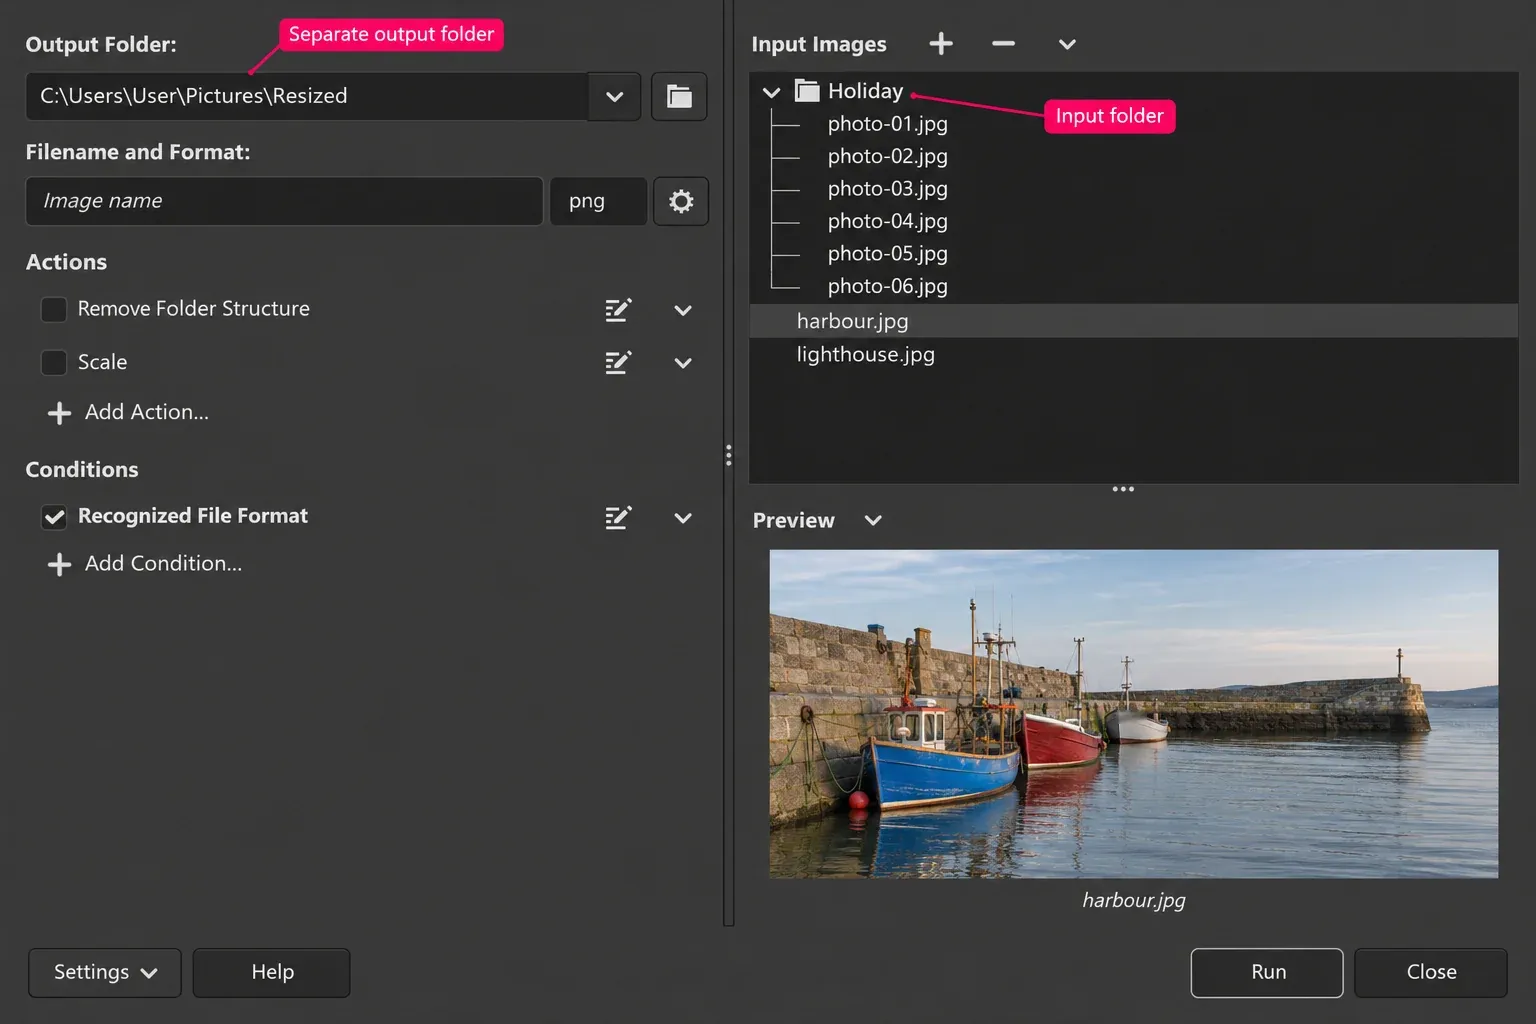
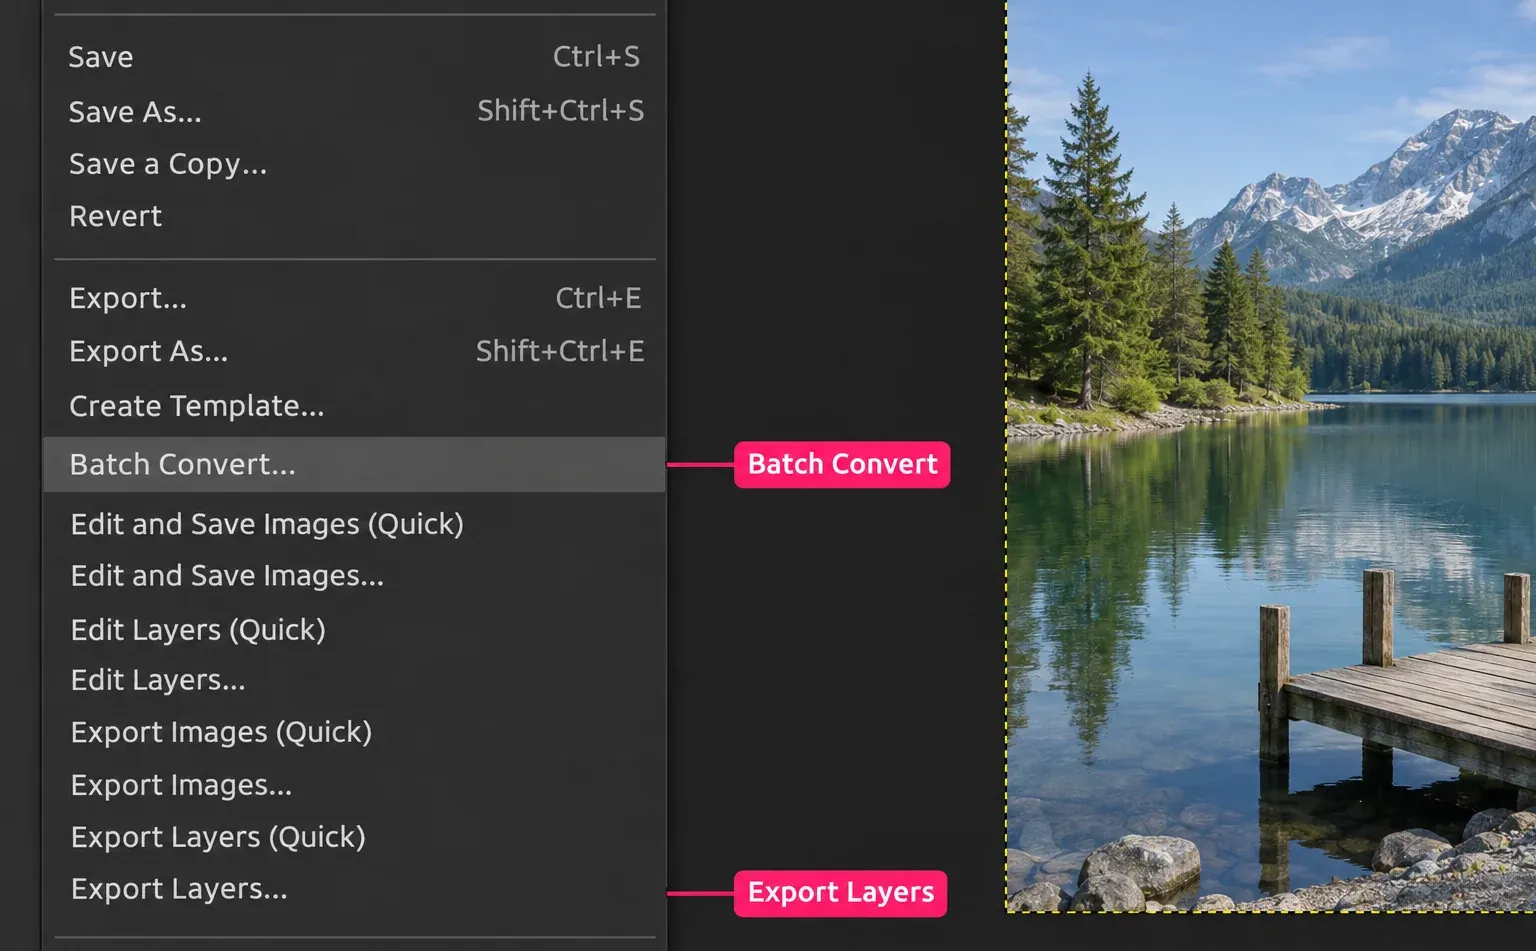
- Open File > Batch Convert.... Add the input files or a small folder with +, or drag them into Input Images.
- Choose a separate output folder, then set the filename pattern and file extension. Avoid Match input folders for the first run: matching names and extensions can overwrite originals.
- Add and enable the operations you need under Actions. For resizing, configure the Scale action and inspect the resulting dimensions. An unchecked action won't perform the edit.
- Review Conditions and the input list. Batcher normally filters out unrecognised file extensions; a third-party loader can require changing the Recognized File Format condition.
- Inspect the preview, set the file format's export options, then press Run. Reopen an exported file and check dimensions, colour, transparency and compression before processing the rest.
- If files are missing or processing stopped, inspect Settings > View Logs and the active conditions. Check which files were exported before rerunning.
These controls follow Batcher's documented conversion workflow. Its preview is approximate: for example, it can show transparency and omit JPEG compression artefacts even when the chosen export can't preserve them. The reopened output is the acceptance check.
Choose the command that matches the input. File > Export Layers... exports layers from one open image; File > Export Images... exports whole open images. Edit and Save Images... can save open images in place, so preserve working copies before using it. Quick commands reuse settings, including actions and conditions that their smaller dialogs don't show. Use the full dialog while establishing the job.
G'MIC-Qt: add filters with the correct host package
Choose G'MIC-Qt when the missing capability is an image-processing or artistic filter. The G'MIC download page lists version 4.0.7 with a separate GIMP 3 section: a Windows installer or ZIP, Linux ZIPs for Ubuntu 26.04 and Debian 13, and a Flatpak extension. The Windows package names target GIMP 3.2. Check the host target and package requirements instead of assuming a package name covers every later build.
Use the G'MIC installation route for your GIMP package, then open Filters > G'MIC-Qt.... That host command accepts RGB and greyscale images; an indexed GIF can need conversion before it becomes available.
Save the XCF and work on a duplicate layer for the first filter. Choose a filter that solves the actual problem, adjust it in the preview, and inspect which layer or output image receives the result. Check texture and edges at full size as well as the final display size. A dramatic preview is a poor reason to accept lost skin texture, a halo or clipped highlights.
Don't assume every added filter remains an adjustable effect after applying it. Inspect the resulting layer structure and keep the original layer available. For routine work, save a useful setting only after checking the exported result; a large filter collection doesn't remove that decision.
Resynthesizer: choose texture repair with realistic limits
Resynthesizer 3.0.1 supports GIMP 3.0 and later. Its Filters > Enhance > Heal Selection... command fills a selection from nearby texture. I'd use it for an isolated distraction against sand, grass or another fairly consistent surface. For a railing, lettering or an important straight edge, controlled cloning often gives a more predictable repair.
Keep the object, its unwanted shadow and the intended fill on the correct photo layer. Duplicate that layer, select the unwanted area, run Heal Selection, then inspect the join and repeated texture before keeping the result. The Heal Selection workflow explains source direction and sampling width, including how to exclude unsuitable material from the surrounding sample.
The package must contain the Resynthesizer engine and its companion scripts. Seeing Heal Selection in a menu doesn't prove the engine loaded. Linux Flatpak users have a version 3.0.1 extension for the GIMP runtime. On Windows, community builds include reported GIMP 3.2 successes; these are separate from an official upstream Windows binary.
Two limits matter before using it on valuable work. The algorithm works internally at 8-bit precision, even when the document retains a higher-precision encoding. It also synthesises matching texture rather than recovering what was behind an object. Keep another repair method available when subtle high-precision colour or recognisable geometry is essential.
Heal Transparency is a different operation. It fills transparent pixels and removes the layer's alpha channel. Don't use it to tidy a cut-out that must retain transparency. Heal Selection and Heal Transparency aren't interchangeable fixes for a missing background.
GEGL Effects and small scripts fill different gaps
For elaborate bevels, glows and outlines, GEGL Effects combines text and layer styling operations. The maintainer provides Windows and Linux binaries and requires companion operations for the full effect. Keep the supplied dependencies together. For an ordinary title outline, I'd first use GIMP 3's editable text outline; it keeps the words and simple outline straightforward to revise.
GEGL filters use a different loader and folder. The maintainer's binary download instructions distinguish Windows .dll files from Linux .so files and give separate locations. For GEGL 0.4, the documented user locations are:
- Windows:
%LOCALAPPDATA%\gegl-0.4\plug-ins. - Linux native installation:
~/.local/share/gegl-0.4/plug-ins. - Linux Flatpak:
~/.var/app/org.gimp.GIMP/data/gegl-0.4/plug-ins.
Check the current instructions before copying files, since the GEGL version forms part of the path. Putting those binaries into GIMP's ordinary Python plug-ins folder won't follow that installation route. The listed releases don't establish a Mac DMG package.
For a smaller automation job, select a maintained script by its exact function. Akkana Peck's collection separates GIMP 3 ports into gimp3: Saver can save an XCF and an export copy, while Arrow Designer creates an arrow on a new layer from a rectangular selection. The repository also contains older Python and Script-Fu files, so downloading the whole collection doesn't make every file compatible. Follow the individual port's instructions and keep its required executable permissions on Linux or Mac.
Keep specialist tools out of the default install
Fourier adds FFT Forward and FFT Inverse under Filters > Generic for frequency-domain work, including periodic patterns in scanned print. Its GIMP 3 release contains Windows packages named for GIMP 3.0.0; the maintainer warns that binaries depend on the GIMP build. That isn't a blanket compatibility promise for every 3.2 installation. Choose it when the scan pattern calls for Fourier work and you have a matching package.
Intel's OpenVINO AI Plugins target GIMP 3, Python 3 and a separate AI runtime, with Windows and Linux instructions. The project reports testing on Ubuntu 24.04, recommends building GIMP from source for that Linux route and excludes Flatpak. It is an option for a specific AI task, not my first addition to an otherwise working editor. Read the required models, devices and runtime setup before choosing it.
Check built-in features and old recommendations
Wavelet Decompose already ships with GIMP. Filters > Enhance > Wavelet Decompose separates the active layer into detail scales and a residual layer. It's a sensible starting point for retouching texture at different scales; don't download a legacy package just to obtain that command. The output still needs restrained edits and inspection so smoothing doesn't remove the texture you meant to preserve.
For camera RAW files, choose the external RAW editor workflow. GIMP 3.2 added ART support alongside its darktable and RawTherapee import plug-ins. The RAW editor remains a separate application; an effects pack doesn't replace that processing stage.
BIMP and Liquid Rescale need particular care. BIMP's latest upstream release is 2.6, and its Flathub add-on was retired for lacking a GIMP 3 version. For a new GIMP 3 batch job, Batcher has the clearer documented route. This doesn't rule out a separately maintained port, but an old BIMP tutorial doesn't verify one.
Liquid Rescale's GIMP 3 port request remains open and unmerged, and its Flathub add-on is retired for the same GIMP 3 compatibility reason. A proposed port is different from a released package for your installation. If seam carving is essential to an existing job, resolve that dependency before changing the working setup.
Find the command and separate installation failures
For an ordinary GIMP plug-in, open Edit > Preferences > Folders > Plug-ins on Windows or Linux. On Mac, Batcher's instructions use GIMP > Preferences (or Settings) > Folders > Plug-ins. Use the relevant user folder shown there and preserve the supplied package structure. For a single-file GIMP 3 Python port, the folder and main file normally share a base name; multi-file packages also need their supporting files. The full installation guide covers these layouts.
Restart GIMP, then press / and enter the command name. Each plug-in chooses its menu location: Batcher is under File, G'MIC-Qt is under Filters, and Heal Selection is under Filters > Enhance. Searching avoids hunting through the wrong menu.
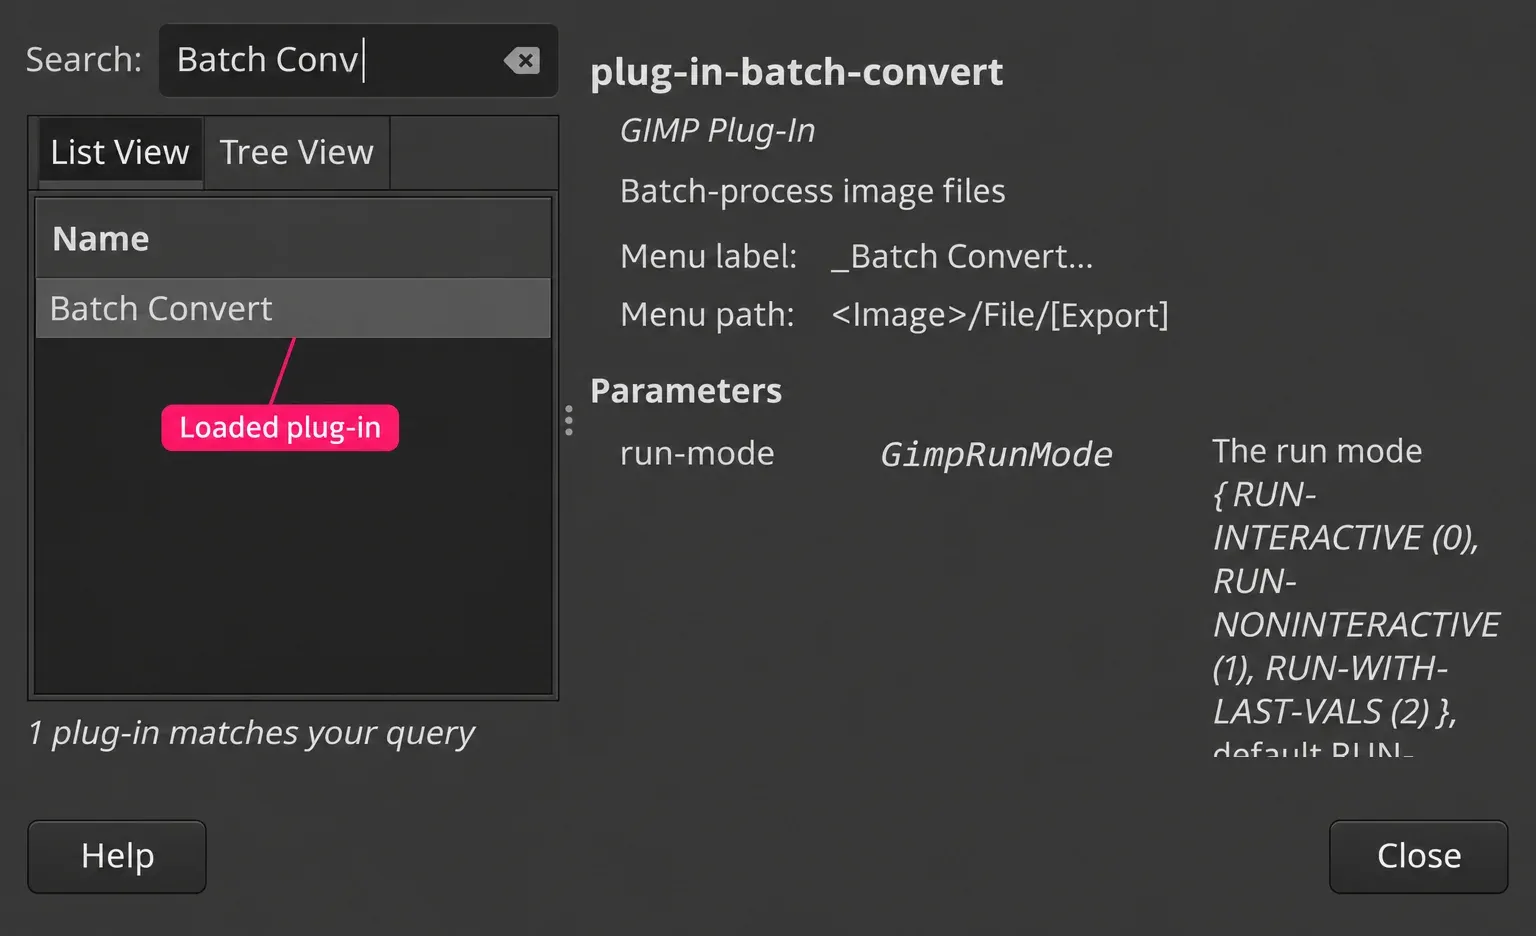
Help > Plug-In Browser shows loaded plug-ins and lets you search their names; it doesn't run them. Use it to distinguish a registered command from a package GIMP never loaded. For a GEGL operation, use Help > GEGL Filter Browser instead; the ordinary plug-in list isn't the complete list of GEGL filters.
- No command after restarting: check the GIMP 3 port, correct package, actual folder, matching subfolder name, supporting files and required permissions. For GEGL, check its own path and companion operations.
- The command is listed but disabled: open an image and check the required image mode and selected layer. For example, G'MIC's host registration accepts RGB and greyscale, while Wavelet Decompose is disabled in indexed mode. Repeated installation won't change that input condition.
- A dialog opens but the job fails: record the exact error and check the plug-in's runtime or engine dependencies. A missing Resynthesizer engine is different from a missing menu entry. With Batcher, also check conditions and logs.
- An added package prevents normal startup: close GIMP, move only that newly added user package to a holding folder outside the search path, then restart. Keep it recoverable. Don't delete the whole GIMP profile or unrelated plug-ins.
When asking a maintainer for help, include the full GIMP version, operating system and architecture, installation source, plug-in release, package source and exact error. State whether the command is absent, disabled or failing during execution. Those distinctions are more useful than "the plug-in doesn't work".
Accept the result before making the plug-in routine
Use the maintainer's project for downloads; the old official registry is retired. A catalogue can help you discover a tool, but follow it through to the current release and installation instructions. Plug-ins are executable programs, so the source matters.
Save the editable XCF before a new operation and keep original files outside the first batch's output folder. The GIMP manual warns against editing an image while a plug-in is working on it; let that operation finish before making another change to the same image.
Then check the actual deliverable. For a batch, inspect filenames, dimensions and a reopened export. For retouching, inspect the repaired edge and texture. For a layer effect, save and reopen the XCF and confirm the controls you need remain available. Keep the plug-in when that complete path solves your job; leave the rest until a specific edit needs it.

Elena Morris
Elena Morris is the GIMP image-editing and compositing editor at TheGIMP.net. She writes about selections, masks and layers, restrained retouching, compositing and export.