How to install plug-ins in GIMP 3 and why old ones fail
Match the GIMP 3 package, find its personal folder and keep the right subfolder layout. Check execute permissions, Script-Fu packaging and Flatpak scope.

To install a plug-in in GIMP 3, first check the download's supported GIMP version and operating system. A GIMP 2.10 plug-in won't become a GIMP 3 plug-in just because it's in the right folder. For a compatible package, use the installer's instructions or the personal folder shown in GIMP's Preferences, restart GIMP, then search for the command by name.
I'd start with the maintainer's GIMP 3 package because the executable, its dependencies and its registration all have to fit the installed application. Add one package at a time so a failed restart has an obvious first suspect. If you haven't chosen an add-on yet, compare the GIMP 3 plug-ins by the task they solve first.
Identify the package before choosing a folder
Check Help > About GIMP for the installed version, and establish whether the application came from a native installer, a package manager, Flatpak or another package. A download labelled Linux isn't automatically the right package for every Linux edition. On macOS, match any Intel or Apple Silicon requirement the maintainer states.
For a file-format add-on, try opening a representative file in the current application first. GIMP 3 already imports DDS textures, including modern BC7 compression, so an old tutorial's separate DDS download may solve a problem your copy no longer has. A supplied format plug-in doesn't need another manual installation.
GIMP 3 changed the plug-in API and broke compatibility with GIMP 2.10 plug-ins and scripts. An old Python 2 script has to be ported to Python 3 and the new API before GIMP 3 can run it. The stable API across the GIMP 3 series is a different boundary: GIMP 3.0 plug-ins are intended to continue working in 3.2, while platform packages and dependencies still need to match.
If a package advertises only Photoshop support, don't infer GIMP compatibility. Look for an explicit GIMP 3 build. Plug-ins are executable programs, so use a trusted maintainer's release page and read its instructions before opening an installer or running a script. A recommendation in a tutorial doesn't establish that a download is safe. The GIMP plug-in manual distinguishes ready-made packages from source code. An archive containing C source and a Makefile isn't automatically a ready-to-copy Windows or Mac plug-in.
| What you downloaded | Installation route |
|---|---|
| Installer | Follow its instructions for the exact GIMP version and operating system. It may place several files. |
| Precompiled, Python 3 or GIMP 3 Script-Fu plug-in | Use its documented layout inside a Plug-ins search folder: each entry file in its own matching-name folder, executable on Linux and macOS. Keep required companion files together. |
| Classic Script-Fu script | Use the Scripts folder when the script's instructions specify that route. |
| Flatpak extension | Use the extension for the Flatpak copy of GIMP, in the same installation scope. |
GEGL filter binary, often .dll or .so | Follow its GEGL-specific installation instructions. The ordinary GIMP Plug-ins folder may be the wrong destination. |
The filename extension alone doesn't choose the route. For example, the GEGL Effects maintainer gives separate GEGL binary folders, including a different Flatpak location. Don't place an unfamiliar DLL beside GIMP executables or download replacement libraries from a random DLL site.
Script-Fu is GIMP's TinyScheme language, and GIMP 3 replaced the old Python-fu setup with standard Python 3, as the GIMP 3.0 release notes explain. The package's declared installation method decides the folder, whatever the file calls itself. The old GIMP Plug-in Registry is discontinued; follow an active project's own releases rather than searching it for a current download.
Ask the running GIMP for its personal folder
- On Windows and Linux, open Edit > Preferences. On macOS, open the GIMP application menu and choose Settings or Preferences, whichever label your system shows.
- Expand Folders. Select Plug-ins for a manually installed plug-in, or Scripts for a classic Script-Fu script.
- Read the search locations listed by that copy of GIMP. Choose the personal writable location for the package you are adding.
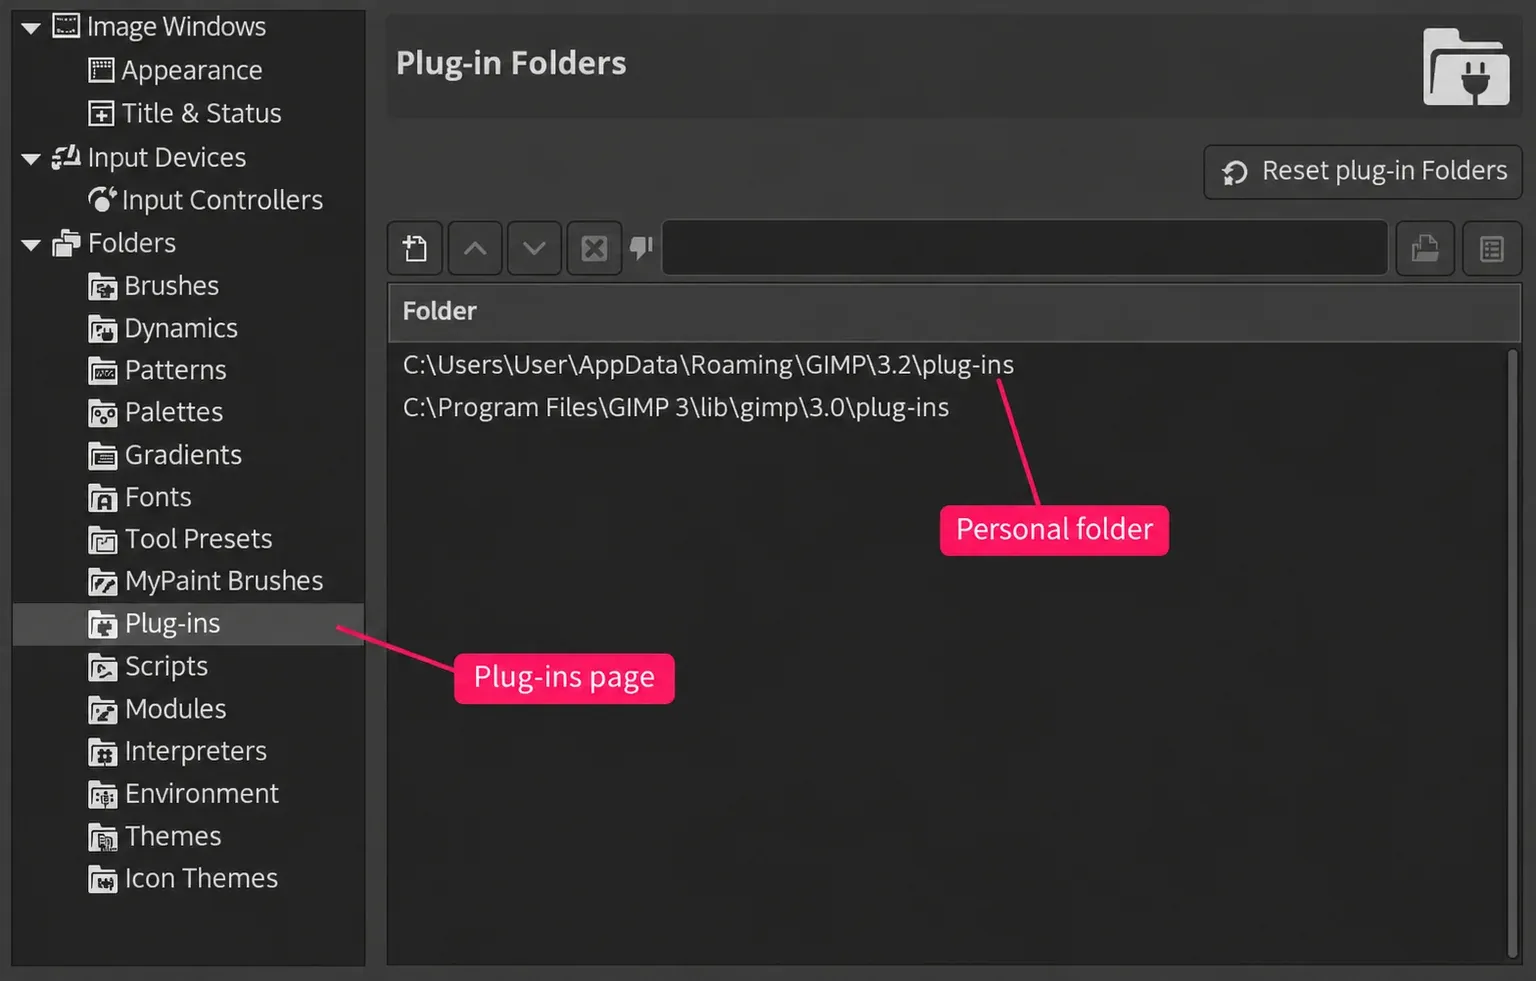
The Data Folders settings distinguish supplied system resources from personal additions. Leave supplied files alone and choose the personal writable location. Don't paste a path from a GIMP 2.10 tutorial into a GIMP 3 installation, or assume that a native Linux path also belongs to the Flatpak copy.
If you see only Temporary Folder and Swap Folder, expand the arrow beside Folders in the left-hand tree; Plug-ins is a child entry. Open the displayed personal path in your file manager. You can use an existing custom search folder, but make sure that the folder really exists: GIMP's preferences won't create it for you. Avoid writing inside the application bundle on a Mac or the supplied Program Files resources on Windows.
For a manual archive, extract the package first. GIMP's manual requires a separate folder with the same name as the plug-in. Keep the executable and any companion files in the arrangement the maintainer supplies. Avoid an extra archive-wrapper directory that leaves the real entry file another level down. An installer should use its documented arrangement.
For example, Resynthesizer's GIMP 3 folder layout puts its engine and Heal Selection in separate matching-name folders. Heal Selection doesn't run without the engine, so follow the Resynthesizer installation guide and the maintainer's names for the full suite.
A .scm file can be either kind: a classic Script-Fu script goes in Scripts, while a GIMP 3 Script-Fu plug-in such as plug-in-heal-selection.scm goes in its own matching-name folder under plug-ins. The maintainer's instructions say which one you have, and so does the file's first line: the Script-Fu programmer's reference gives a GIMP 3 plug-in a shebang first line such as #!/usr/bin/env gimp-script-fu-interpreter-3.0.
Save open work before restarting. Once the package is in its intended search folder, restart GIMP so it can discover the addition. Use a disposable image for the first operation and keep your working XCF available.
Give a manually copied plug-in permission to run
For a GIMP 3 Python plug-in installed by hand, the official Python plug-in tutorial gives this precise arrangement:
plug-ins/
└── py3-hello-world/
    └── py3-hello-world.py
This is a documented filename example. Use your package's entry name instead, and preserve its companion files. A source archive's outer folder isn't necessarily the plug-in folder. Opening the package should reveal the entry file at the depth the maintainer specifies, rather than another ZIP or several unrelated source directories.
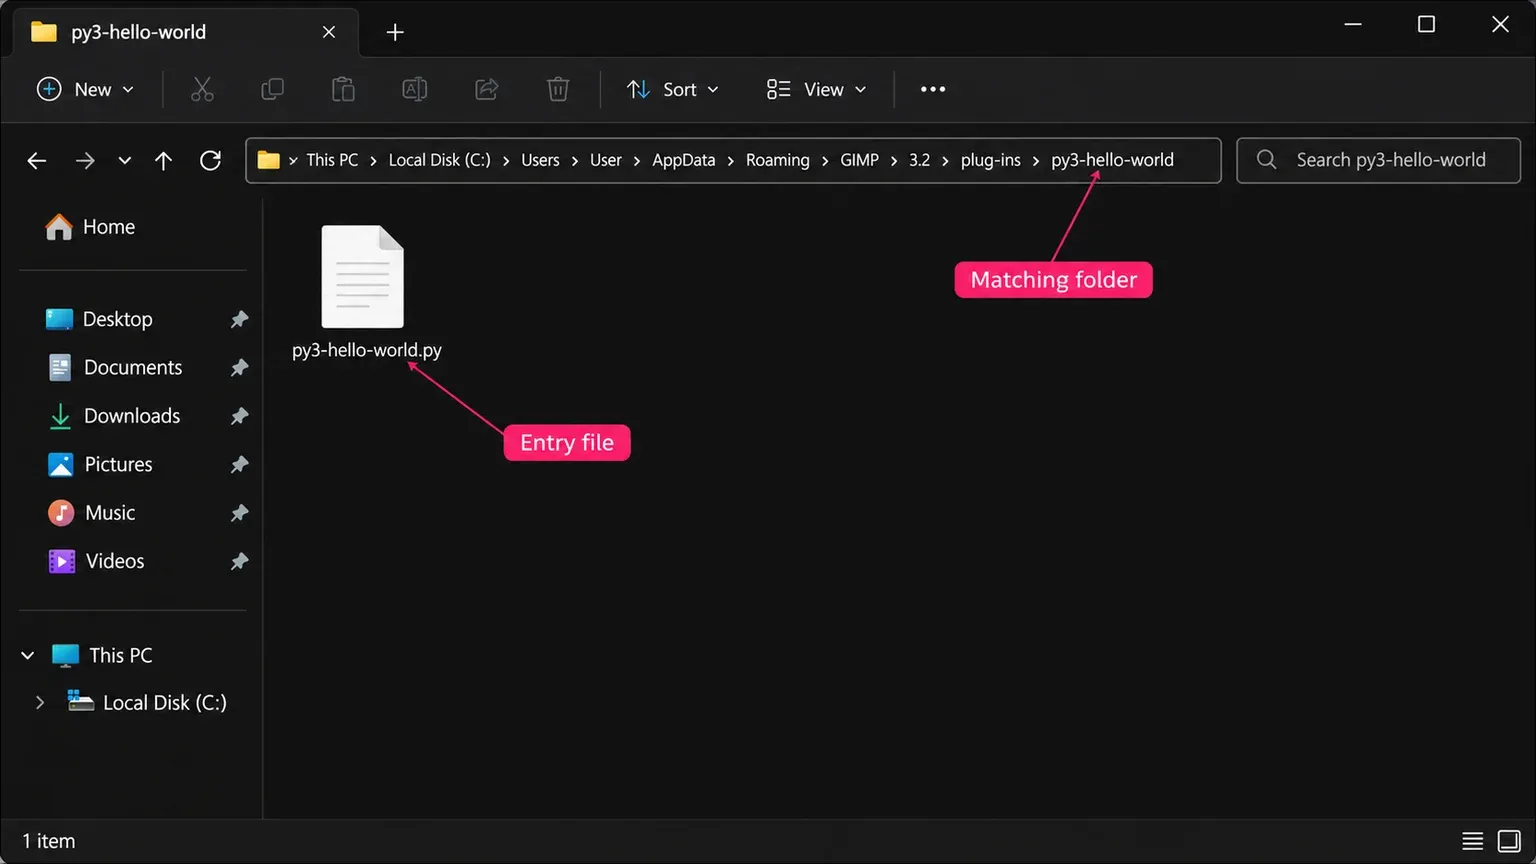
On Linux and macOS, every entry file you copy into plug-ins by hand needs permission to execute, whether it's Python, Scheme or a compiled program. The tutorial sets that rule for the Python file, the Script-Fu reference sets it for a GIMP 3 Script-Fu plug-in, and Resynthesizer's install notes mark both its .scm plug-ins and its compiled engine as executable. In Terminal, run chmod u+x with that one entry file's quoted full path as the argument. If Terminal is already in the tutorial example's subfolder, the command is chmod u+x py3-hello-world.py. This adds execute permission for the file's owner.
Apply that step only to a compatible package you trust, one entry file at a time. An installer follows its own instructions, and the classic Scripts-folder procedure below doesn't include this step. There's no reason to change permissions recursively on the whole GIMP settings tree or run GIMP as an administrator to fix an entry file.
A Python 3 installation somewhere on the computer doesn't, by itself, supply GIMP's Python bindings or every add-on dependency. Follow the package's requirements. For example, Batcher's installation instructions distinguish Windows Python support from the additional bindings needed by some Linux packages. Reinstalling an unrelated Python version won't port a Python 2 plug-in.
Use the Scripts folder for the documented Script-Fu route
The Script-Fu installation procedure says to copy or move the downloaded script to a Scripts folder listed under Preferences > Folders > Scripts. If GIMP was open when you added the script, restart it.
That's the route for a classic script. A .scm file whose first line is the #! shebang shown above is a GIMP 3 plug-in and uses the plug-ins layout instead. Don't add that line to an old script as a conversion trick: the calls and registration still have to suit GIMP 3.
Find the command before deciding it failed
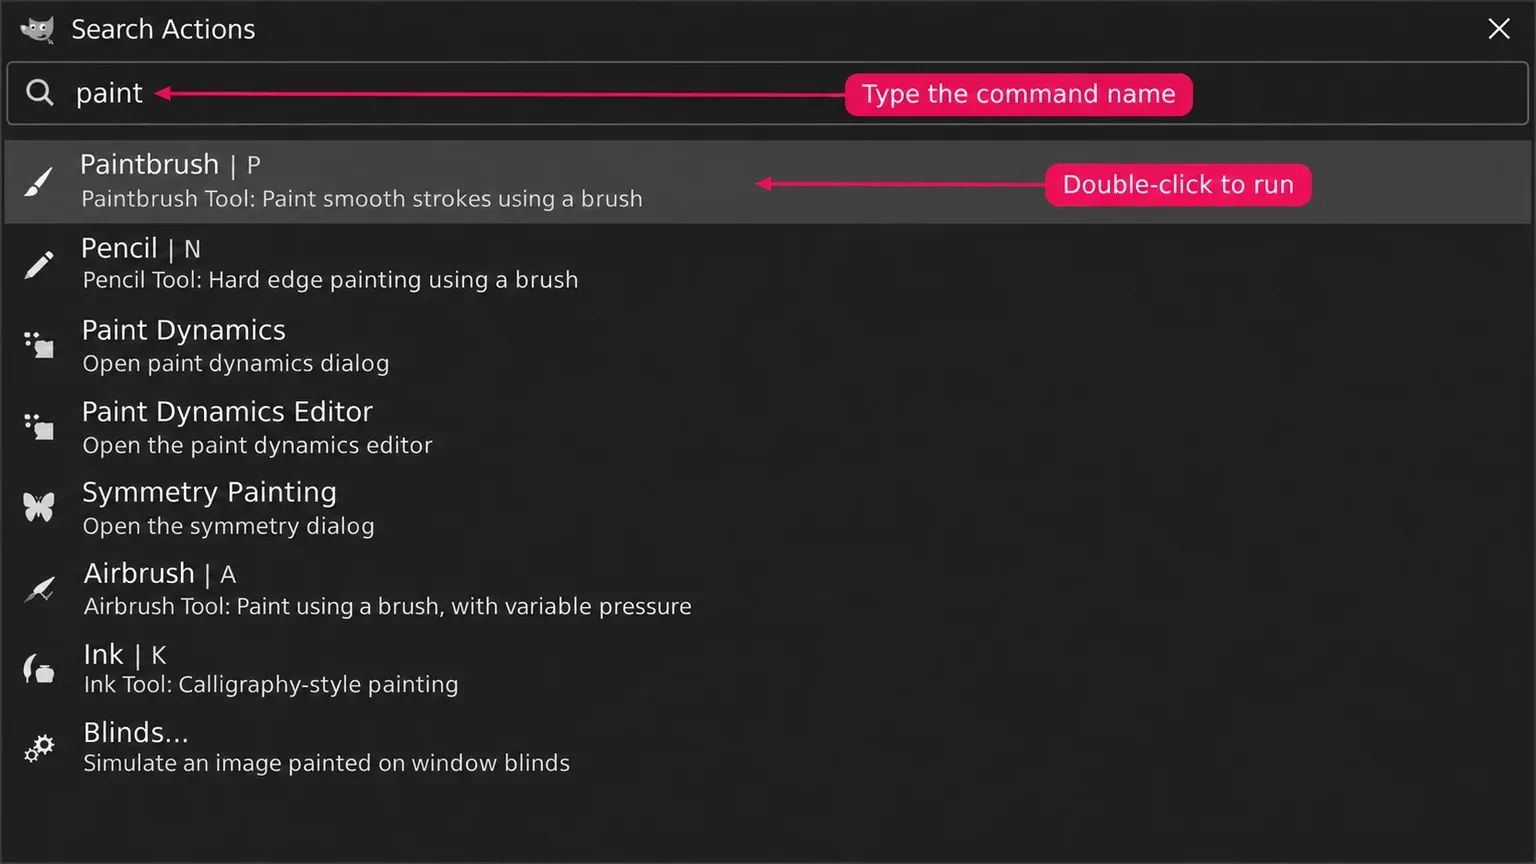
A plug-in chooses where its command appears. It doesn't have to live directly under Filters. Open Help > Search and Run a Command and enter the command name from the maintainer's instructions. GIMP's command search includes commands outside menus; double-click a matching result to start it.
If it still doesn't appear, open Help > Plug-in Browser and search the loaded plug-ins. This browser shows information; it doesn't launch the plug-in. Search by the maintainer's documented command or plug-in name, which can differ from the archive filename.
I'd separate a loading failure from a command that can't run on the current image. Moving a loaded plug-in through more folders won't fix its required image mode or layer selection.
| What you see | What to check next |
|---|---|
| No entry after restarting | GIMP major version, OS/package build, search location, matching entry folder, companion files and stated dependencies. Check the execute bit for a manually copied Unix entry. |
| Listed, but its command is disabled or rejects the image | The add-on's requirements for image mode, layer type and number of selected layers. Open a disposable image and select the intended layer before trying an image-dependent operation. |
| The command opens, then reports another missing procedure | The maintainer's required helper plug-ins. A menu script and its engine can be separate components, as with Resynthesizer. |
| It crashes or fails during an operation | Stop changing the working picture, preserve the XCF and record the exact error, package version and image conditions for the maintainer. |
Filter availability can depend on the image and selected drawable; check the specific add-on's conditions before changing an image's mode. New GEGL effects have their own Help > GEGL Filter Browser. Classic Script-Fu syntax errors can prevent registration, as the Script-Fu installation manual explains.
Finding the command is only the first check. On a disposable copy, perform the intended operation and inspect the relevant result: the output image or file for an exporter, the changed layer for a filter, or the filled selection for a retouching tool. Keep the source XCF separate. A command that opens without an error hasn't yet demonstrated that its output suits your job.
Choose the documented route for Flatpak GIMP
When the maintainer offers a Flatpak extension, use it with the Flatpak copy of GIMP. Have the Flathub remote configured before using the commands below. An extension has an ID such as org.gimp.GIMP.Plugin.GMic; GIMP's Flatpak packaging rules name its branch after the GIMP API version. The current G'MIC manifest targets branch 3 for stable GIMP.
To identify the installed scope, use the read-only command flatpak list --app --columns=application,installation and find org.gimp.GIMP. The Flatpak list reference defines those columns. If both user and system rows appear, choose the GIMP copy you intend to use and match the extension to that copy; don't assume an install into one scope supplies both.
- Save the open picture and close the Flatpak copy of GIMP.
- Check whether GIMP is installed for the system or only your user. Match that scope explicitly. For the G'MIC extension on a system installation, use
flatpak install --system flathub org.gimp.GIMP.Plugin.GMic//3. For a per-user installation, useflatpak install --user flathub org.gimp.GIMP.Plugin.GMic//3. Replace the extension ID only with one the relevant maintainer provides. Flatpak's installation identifiers and scope options explain the branch and user/system distinction. - Read the extension and branch before confirming. If Flatpak can't find that ID on branch
3, stop and check the maintainer's download page instead of dropping the branch. - Start the same Flatpak copy of GIMP again. Search for the command named in the add-on's instructions, then check it on a disposable image.
The extension belongs to the Flatpak copy of GIMP. A separate native installation needs its own supported package; the G'MIC installation steps cover the platform choices. Don't replace a missing branch-3 extension with its old 2.10 counterpart.
An extension isn't the only possible Flatpak route. Some maintainers explicitly support manual installation of their Python package, including Batcher's Flatpak instructions. Follow that package's stated layout and the running application's search locations. Don't assume a native binary and its system libraries will work inside the sandbox merely because a manually installed Python add-on does.
Undo a manual installation without resetting GIMP
Save the XCF and close GIMP. Move only the newly added plug-in folder out of every configured search location, keeping it as a backup, then restart. For a classic Script-Fu script, move only its added file out of the Scripts search path. Don't remove the parent settings directory, supplied plug-ins or companion files shared with another package.
For an installer, package-manager build or Flatpak extension, use that package's documented removal method. Renaming a folder while leaving it inside the search tree is a less reliable isolation step than moving the added package out of the searched locations.
Watch for a second copy before replacing anything. The plug-in manual says a personal plug-in takes precedence over a system plug-in with the same name. A forgotten personal copy can therefore mask the supplied one. I'd keep a note of the package, version and exact added files so the next update has a clear rollback.
Check the current tool before adding an old effect
If an older tutorial sends you to a plug-in for text outlines, check the Text tool first. GIMP 3.0 introduced non-destructive text outlines, which keep the lettering editable. For a simple border, follow the text-outline steps with those built-in controls.
For any other effect an older tutorial names, choose among the plug-ins ready for GIMP 3 before reviving a 2.10 download.

Elena Morris
Elena Morris is the GIMP image-editing and compositing editor at TheGIMP.net. She writes about selections, masks and layers, restrained retouching, compositing and export.