Resynthesizer for GIMP 3: downloads and installation
Choose a package for your GIMP installation, keep the engine and menu plug-ins together, and check both registrations after restarting.

For GIMP 3, install Resynthesizer 3 with both its engine and its menu plug-ins. Linux users running GIMP from Flathub can add the branch 3 extension; Windows users need a community build or the separate PortableApps package. The upstream 3.0.1 release supports GIMP 3.0 and later but supplies source archives, and the MacPorts package still targets GIMP 2.
I'd choose the Flathub extension on Linux because it keeps the engine and menu commands inside the same GIMP package. On Windows, establish the build's source before letting GIMP load it. If Heal Selection already opens and processes an image, go to the Heal Selection controls and sampling workflow; installation changes won't improve a poorly chosen texture sample.
Choose the package for your running GIMP
Check Help > About on Windows or Linux, or the About item in the GIMP menu on macOS. Note the version, operating system, architecture and package source. A standard installer, PortableApps, Flatpak and AppImage can have different resource locations even on the same computer.
| Your GIMP installation | Applicable route |
|---|---|
| Windows, standard installation | A GIMP 3 community binary matching the platform. Keep the engine, Scheme plug-ins and supplied support files together. |
| Windows, PortableApps | The PortableApps Resynthesizer add-on. Its personal data lives inside the portable installation. |
| Linux, Flathub | Resynthesizer extension branch 3, installed in the same scope as GIMP. |
| Linux, native package or AppImage | A package or source build compatible with that GIMP and its libraries. The Flathub extension won't populate another copy. |
| macOS, GIMP 3 | An advanced source-build route exists. The MacPorts shortcut and old Apple Silicon GIMP 2 downloads don't supply a compatible drop-in package. |
The Resynthesizer repository develops GIMP 3 code on resynthesizer3; its master branch is the frozen GIMP 2 version. A GitHub source ZIP needs compiling. It isn't a ready-made plug-in you can activate by moving it into a folder. Resynthesizer is separate from GIMP, so a new GIMP installation alone doesn't add Heal Selection.
Windows: find a GIMP 3 build and check its source
The upstream README says a Windows build is not tested or supplied in the repository. The GIMP Forum Windows thread contains a community Resynthesizer 3.0.1 x64 build: its uploader reports testing with GIMP 3.2.4 and supplies a SHA-256 checksum. Other replies report working installations on 3.2.2, 3.2.4 and 3.2.6. These are identified installation reports, not a guarantee for every Windows configuration or a native ARM64 package.
Use the original build post, check for subsequent corrections and match the ZIP's version and architecture to your setup. GIMP's manual warns that plug-ins execute programs on your computer. Keep Windows security protection enabled; an old forum reply calling a detection a false positive doesn't establish that a download is safe.
If the uploader publishes a checksum for your exact ZIP, calculate its SHA-256 in PowerShell with Get-FileHash. Replace the example path with the downloaded file's location:
Get-FileHash -LiteralPath '.\your-plugin.zip' -Algorithm SHA256Compare the complete Hash value with the value attached to that file's build post. Stop on a mismatch. A match confirms agreement with the supplied checksum; the uploader and executable still need to be trustworthy.
Copy the complete folders into the personal plug-in directory
- Find the folder in the running GIMP. Open Edit > Preferences > Folders > Plug-ins. Choose the personal resource folder, where GIMP expects user-added resources. For a standard GIMP 3.2 Windows installation it is normally
%APPDATA%\GIMP\3.2\plug-ins, inside the GIMP configuration directory; use the path shown in Preferences if it differs. - Close GIMP completely. Back up any existing Resynthesizer folders outside the configured plug-in paths. Don't replace unrelated add-ons.
- Extract the chosen build and copy its plug-in folders. Each supplied plug-in folder belongs directly inside
plug-ins. Avoid an extra enclosing folder named after the ZIP, and retain accompanying libraries, translations and support files. - Check the two essential paths. The engine is
resynthesizer\resynthesizer.exe; the menu plug-in isplug-in-heal-selection\plug-in-heal-selection.scm. The version 3 installation specification requires matching subfolder names for the other supplied plug-ins too. - Restart the same GIMP and check both registrations below. Launching the engine EXE separately isn't the installation check: GIMP must discover and call it.
plug-ins/
  resynthesizer/
    resynthesizer.exe
  plug-in-heal-selection/
    plug-in-heal-selection.scm
This tree shows the two essential parts, not the whole suite. Its .scm files are GIMP 3 Script-Fu plug-ins, so they belong under plug-ins. Old-style Script-Fu scripts use the neighbouring scripts directory. Moving this suite's files between those directories at random can leave a working menu command without its engine.
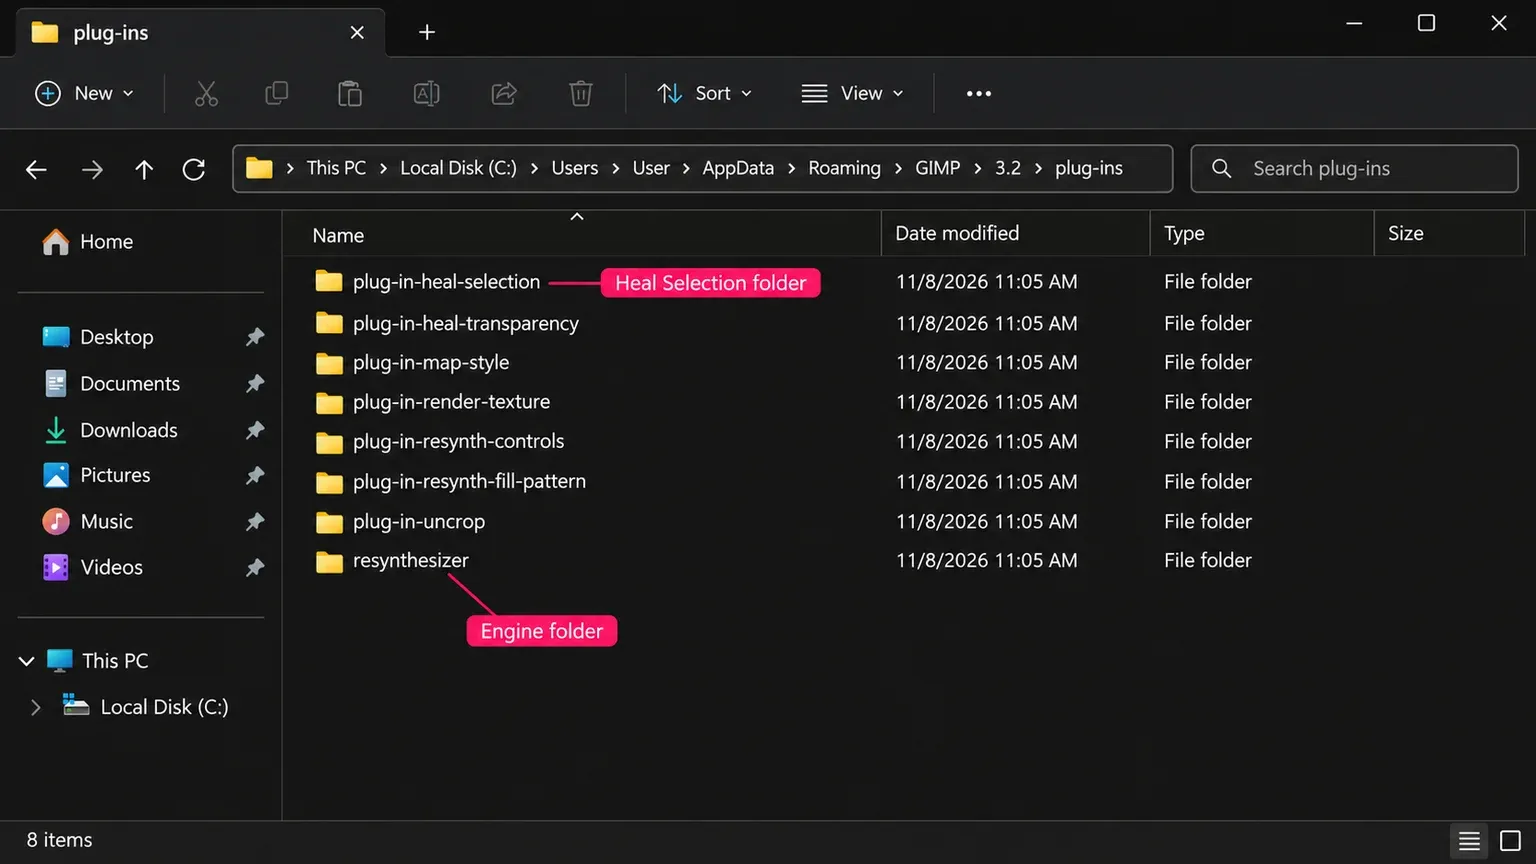
GIMP Portable uses its own data directory
For PortableApps, use the add-on linked under GIMP Portable's App Notes. Run GIMP Portable once, close it, then point the plug-in installer at that portable installation. User additions belong inside GIMPPortable\Data\GimpAppData, with this suite's folders under plug-ins. Leave GIMPPortable\App alone.
The PortableApps support thread records a specific fix in GIMP Portable 3.2.6 Rev 3: the Script-Fu interpreter paths were corrected so the plug-ins could work without a separate, locally installed GIMP. Earlier replies proposing a split between scripts and plug-ins were superseded. If you're diagnosing that older release, update the portable package and use its current add-on rather than editing global interpreter paths or installing another GIMP to satisfy them.
Linux Flatpak: install extension branch 3 in the same scope
This route applies to org.gimp.GIMP from Flathub. The Resynthesizer extension recipe targets that GIMP runtime, uses branch 3 and builds release 3.0.1. It doesn't add a plug-in to a separate distro, Snap or AppImage installation.
First list the installed Flatpak applications and scopes:
flatpak list --app --columns=application,installationFind org.gimp.GIMP. For a user installation with Flathub already configured in that scope, install the matching extension:
flatpak install --user flathub org.gimp.GIMP.Plugin.Resynthesizer//3For the default system installation, replace --user with --system. A named system installation needs its own --installation=NAME option. Read the proposed transaction before confirming: the Flatpak reference syntax makes //3 the extension branch, not GIMP's application version.
Check the installed extension's branch and scope, including runtimes in the listing:
flatpak list --columns=application,branch,installationQuit GIMP fully. For the user installation, explicitly reopen the Flatpak copy:
flatpak run --user org.gimp.GIMPUse the same scope change for a system or named installation. A second desktop shortcut can otherwise reopen a different GIMP. In the GIMP 3 Flatpak installation discussion, selecting branch 3 resolved the old-extension mismatch; copying host-system binaries into the sandbox wasn't the solution.
Native Linux and AppImage need compatible binaries and libraries
Inspect a distribution package's GIMP dependency before accepting its installation. The observed Arch community package gimp-plugin-resynthesizer-git tracks the resynthesizer3 branch; its build recipe and dependencies matter more than an old tutorial's package name. AUR packages are community maintained.
Without a suitable binary package, the source-build route uses Meson, a compiler, Git and GIMP 3 development files. Check the resulting installation path in Edit > Preferences > Folders > Plug-ins. The wiki mixes a 3.0 output path with an old 2.0 search-path example; add the actual build output directory if needed. Manual Linux plug-ins, including Scheme files, need executable permissions. An AppImage doesn't make an incompatible external binary or its missing libraries compatible.
macOS: distinguish a source build from an old GIMP 2 package
MacPorts gimp-resynthesizer depends on gimp2. That command doesn't supply a plug-in for GIMP 3 downloaded from gimp.org. The Apple Silicon GIMP 2.10 tutorial appearing in search explicitly excludes GIMP 3; copying its Python helpers into the new app bundle won't port them to the changed API.
Mac source-build support was merged into resynthesizer3 after the 3.0.1 release. It links against libraries inside GIMP.app and uses development headers plus the GIMP source tree. The contributor reports ARM64 builds with GIMP 3.0.2 and 3.0.4. That is an advanced build route with stated conditions, not a ready-made installer or evidence for every later Mac package.
For a photograph that needs retouching now, I'd use GIMP's built-in Heal tool or Clone while keeping the layered project. For integrated Resynthesizer, choose a package explicitly built for your GIMP and Mac architecture, or follow the source route with the matching development environment. Keep the working editor in place.
Check Heal Selection and the engine separately
After restarting, open a photograph and look under Filters > Enhance > Heal Selection.... You can also use Help > Search and Run a Command and search for Heal Selection. Its menu entry confirms that the wrapper loaded.
Now open Help > Procedure Browser, choose by name and search for plug-in-resynthesizer. A listed entry confirms the separate engine procedure registered. The engine has no menu item of its own, so an absent Resynthesizer menu isn't a reliable diagnosis.
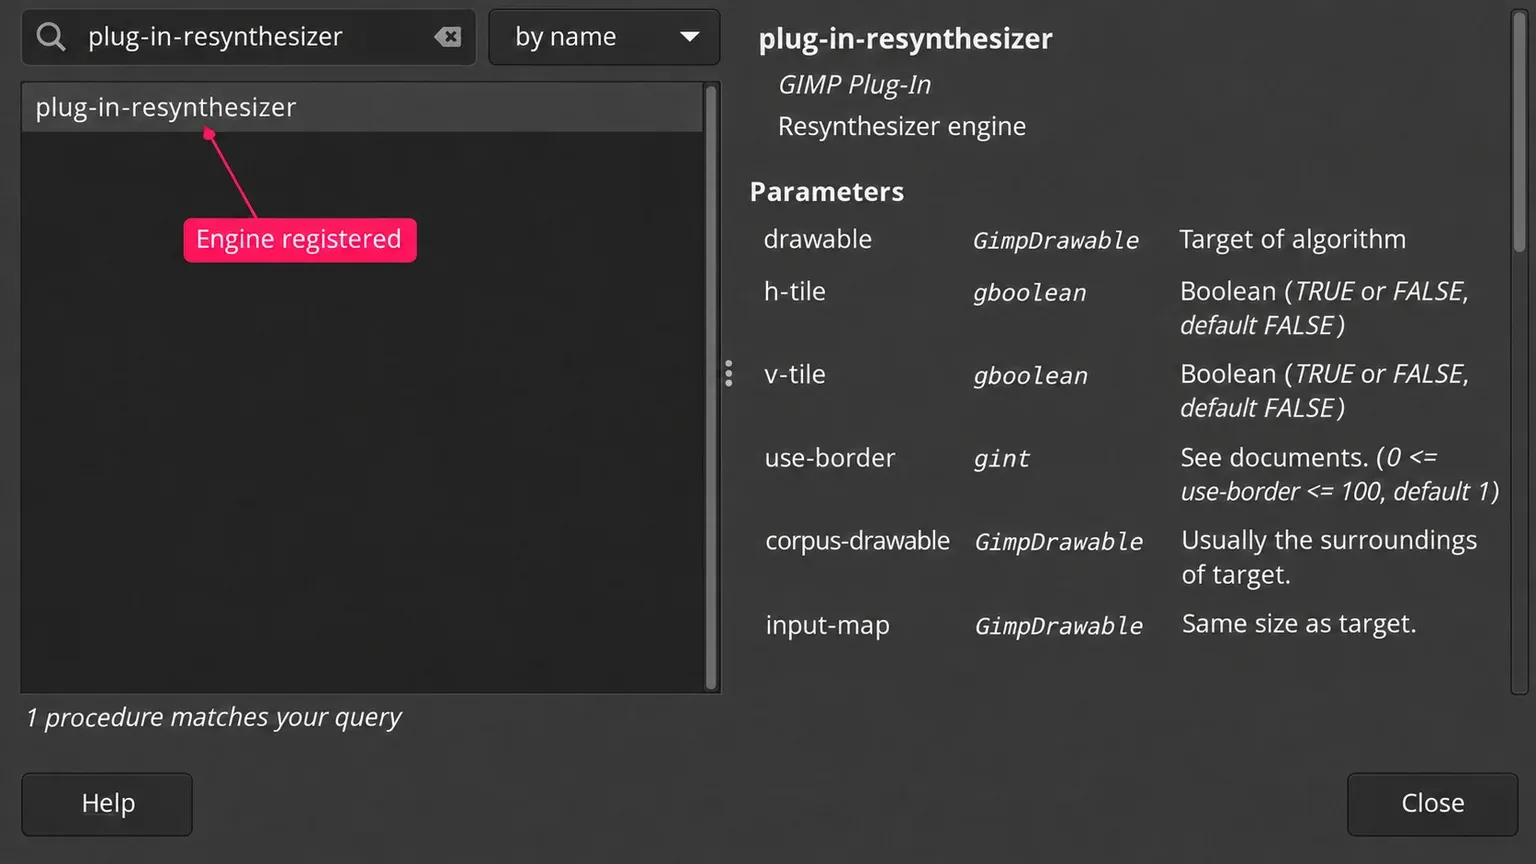
No Heal Selection: recheck the running GIMP package, its current plug-in search path, matching subfolders and executable permissions on Linux. Heal Selection present, engine absent: inspect the engine folder, binary platform, architecture and runtime dependencies. The project's engine diagnosis explains why a wrapper can report a missing plug-in-resynthesizer procedure even though its own dialog opens.
Confirm one small repair and a saved result
Registration is the first check. Processing a small image and reopening the output checks the rest of the path. I'd use a small mark surrounded by grass, sand or similar texture for this first repair; a face or straight railing makes it harder to distinguish an installation problem from an unsuitable sample.
Resynthesizer processes colour internally at 8-bit precision, even if the document retains a higher-precision encoding. An old report that it runs on a 16- or 32-bit image doesn't establish higher-precision processing. If that precision is essential, choose another repair method. For sample direction, texture problems and other commands, continue with the Resynthesizer repair workflow.
- Protect the photograph. Save a working XCF, choose Layer > Duplicate Layers and select only the duplicate's pixel thumbnail. Heal Selection operates on one selected drawable; a blank layer won't sample the composite underneath.
- Select a small area to replace. Use Free Select around the mark and its shadow, leaving clean matching texture outside it. Close the outline and press Enter to confirm the selection.
- Run Heal Selection. Start with Context sampling width (pixels): 50, Sample from: All around and Filling order: Random, the version 3.0.1 script's defaults. Let it finish before editing the same image again.
- Inspect the actual pixels. Choose Select > None, compare with the original layer and check at 100% zoom. Completion without an error confirms this operation ran; a repeated clump, seam or bent edge is a repair-quality problem. Undo a bad fill before retrying with different inputs.
- Save and reopen. Keep the layered XCF, then use File > Export As... for a separate PNG or JPEG. Reopen that exported file and check the repaired area, dimensions and colour. XCF preserves the working project; export creates the delivery file.
Fix the failure you have, and remove only the new files
“You must first select a region to heal.” Confirm a bounded selection before running Heal Selection. Choosing the entire photograph leaves no useful surrounding source. If several layers are selected, select only the intended photo layer; the script processes one drawable.
“Returned no value”, an interpreter error or a crash: record the complete message, GIMP and Resynthesizer versions, operating system, architecture and package source. Check the same small input first. For Heal Transparency, a layer needs actual transparent pixels; the PortableApps reproductions distinguish a hole from an alpha channel alone. Don't turn an input error into a DLL-replacement exercise.
Old GIMP 2 files or duplicated copies: leave the 2.10 installation's files in place, but keep them out of GIMP 3's search path. If you've already copied old Resynthesizer files into GIMP 3, close GIMP and move only those identified files to a backup outside every configured plug-in path. Don't clear the whole directory. Python helpers from Resynthesizer 2 and resynthesizer-gui.exe identify the old suite; other Python plug-ins may be perfectly valid.
Remove a manually added 2.10 folder from Preferences > Folders > Plug-ins if it is present. Removing the search-path entry doesn't delete the folder's contents. Check for a second copy with the same name: GIMP gives a personal plug-in precedence over a system copy. Use the package manager to remove a managed add-on rather than deleting files inside its runtime.
Skip Sharpen by Synthesis and Enlarge and Sharpen by Synthesis: the current installation specification marks them obsolete. If GIMP stopped starting immediately after a manual installation, move just that newly added suite outside its search paths, then reopen GIMP. Keep your XCF and original photo; reinstall only after the package, folder layout and exact failure are identified.

Elena Morris
Elena Morris is the GIMP image-editing and compositing editor at TheGIMP.net. She writes about selections, masks and layers, restrained retouching, compositing and export.