Change the font of existing text in GIMP
Change a whole caption or one word, understand layer defaults and character formatting, recover rasterised text safely, and check the finished export.
To change the font of existing text in GIMP, activate its text layer, choose Tools > Text, and click the words on the canvas. Highlight the characters you want to change, then choose the replacement font in the toolbar above the text. Select every line for a whole caption, or just one word for a local change. I'd use this explicit selection for an existing design because you can see exactly which letters will change.
Start inside the existing text layer
Select the caption's row in the Layers dock before using the Text tool. A text layer retains the words and their formatting; a photograph containing visible lettering may only contain pixels. The layer's name alone doesn't establish that it's editable text.
- Open the layered XCF project if you have it. Choose Windows > Dockable Dialogs > Layers if the layer list is hidden.
- Activate the text layer containing the caption. Check the text symbol on its thumbnail and the words visible in the image.
- Choose Tools > Text, or press T before entering text-editing mode.
- Click the existing words. You should see the text box and be able to place a typing cursor among its characters.
This is the documented route for editing text later. If a new empty box appears elsewhere, return to the original layer and click its words. Don't type a second copy over the caption while trying to reach the first one.
Pause if a warning says editing will discard alterations made with other tools. Save a separate XCF before accepting a destructive change; the recovery choices below explain when to restore text and when to preserve the existing appearance.
Change the font of the whole caption
Highlight the characters inside the text box. Selecting the layer in the dock identifies the object; selecting characters identifies the range that the on-canvas toolbar will format.
- With the Text tool inside the existing caption, drag from the first character to the last. Include all lines and any separately styled words. You can also extend a selection with Shift and the arrow keys.
- Click the font-name field in the toolbar above the text box. Start typing the replacement font's name and choose the matching entry from the drop-down list.
- Leave the size, colour and spacing controls alone if you only want a font change.
- Inspect the first and last words on every line. Check that no phrase was left outside the highlighted range.
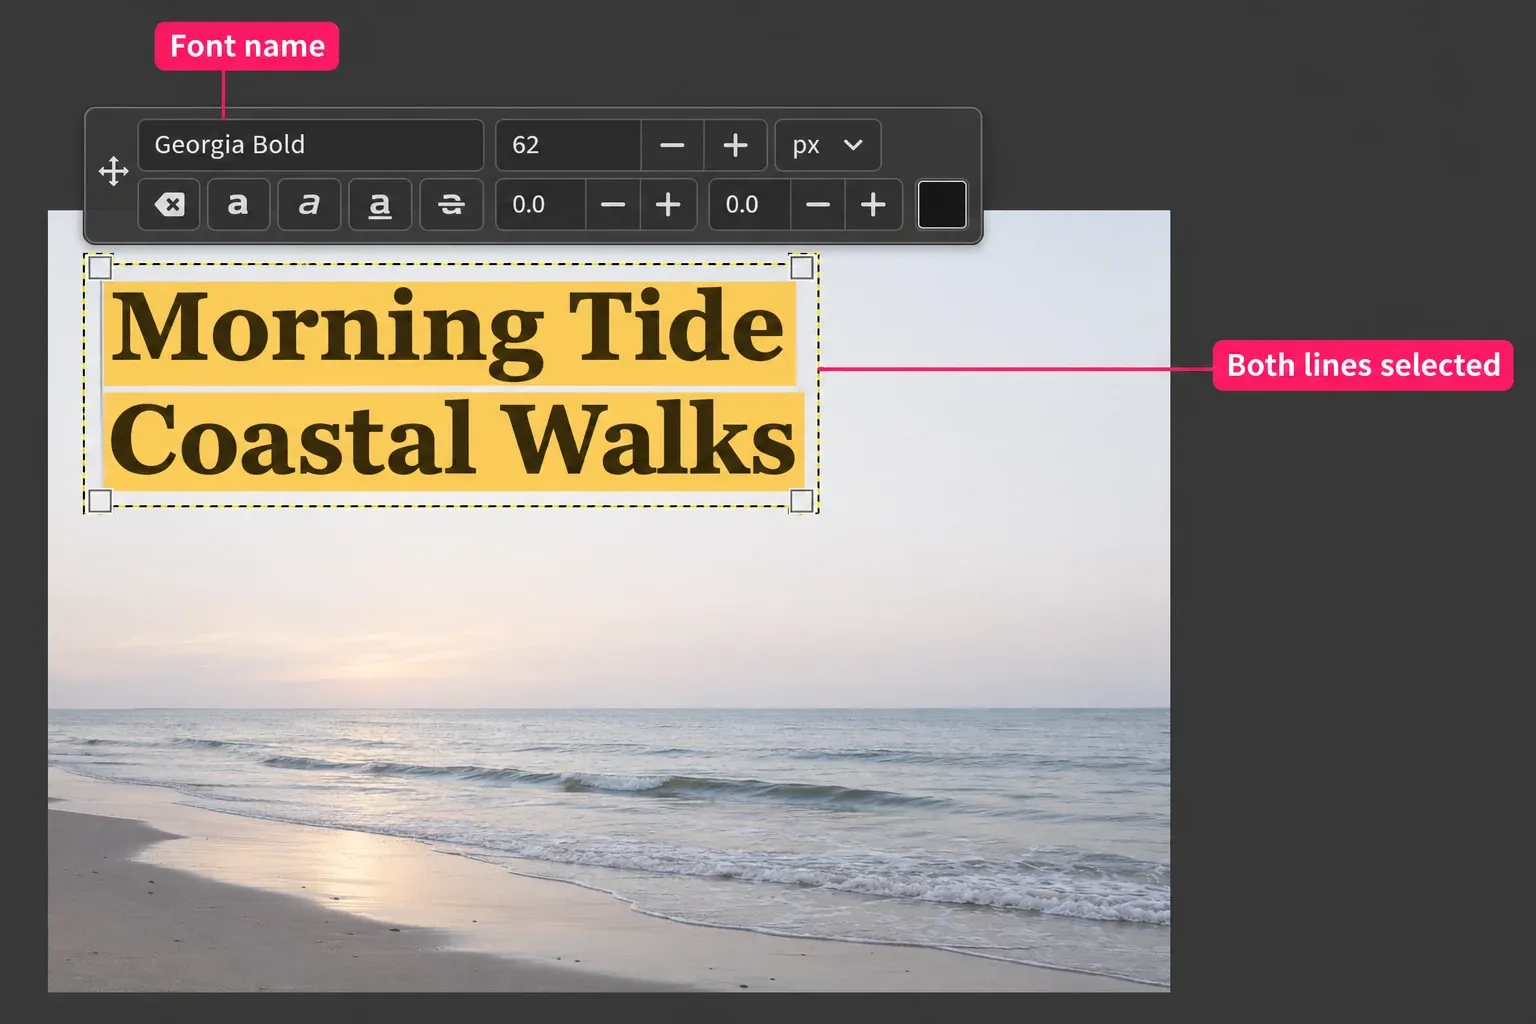
The on-canvas font field applies to selected characters, or to new text typed after the cursor. A blinking cursor without highlighted letters isn't a whole-caption selection. If only newly typed letters use the replacement font, reselect the existing words before choosing it again.
You don't need to delete and retype the caption. Keeping its text layer also preserves a useful starting point for the next wording change.
Change one word while keeping the surrounding text
Activate the same text layer, click inside its box and highlight only the word or phrase you want to restyle. Change the font in the toolbar above the box. Check the neighbouring characters afterwards: an accidentally included space or letter extends the changed range.
In a caption such as Fresh bread daily, selecting only bread lets that word use another face while the rest keeps its current formatting. This is a formatting change within one text layer; it doesn't require a new layer for each word.
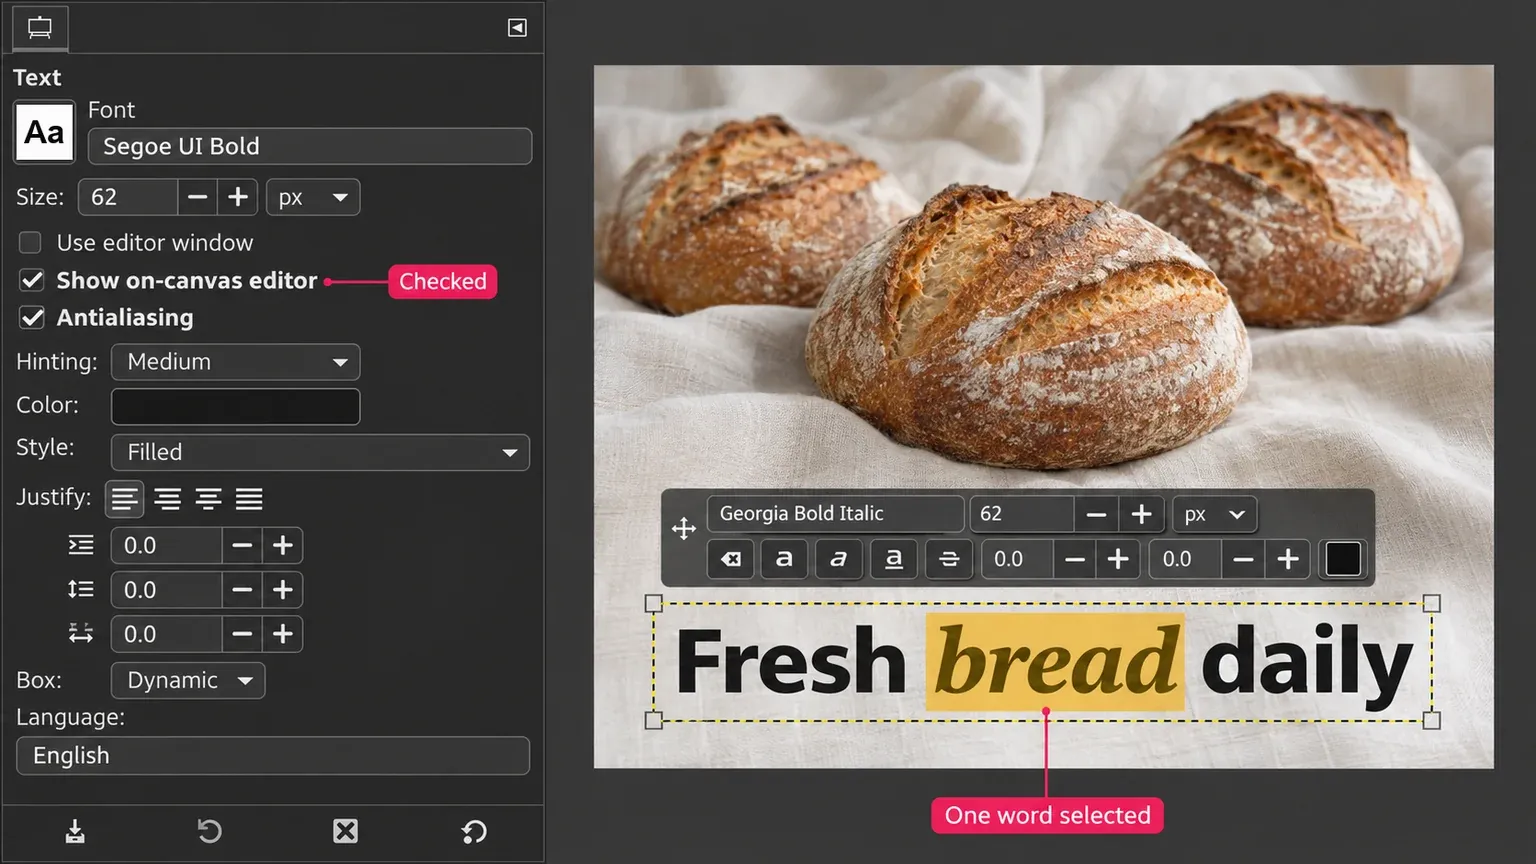
If the toolbar is missing, enable Show on-canvas editor in Text Tool Options. Use editor window is a separate option for editing the text in another window. You don't need to enable it just to show the formatting toolbar above the caption.
Drag the toolbar by its handle when it covers the letters you need to inspect. The text context menu's Restore On-Canvas Editor Position returns a moved toolbar to its original location.
Why Tool Options changes some letters but leaves others
GIMP has a font setting for the text layer in Tool Options and font formatting that can be applied to selected characters on the canvas. An explicit character font can remain in place when you change the layer's default font. That explains the reported case where existing letters stay unchanged but new typing uses the new font.
For a caption with one consistent style, activate its text layer and choose the font in Tool Options. Click the Aa preview button beside Font to open the Text tool's Font selector, then pick an installed face. The font field in the on-canvas toolbar works differently: type the name there to get matching suggestions.
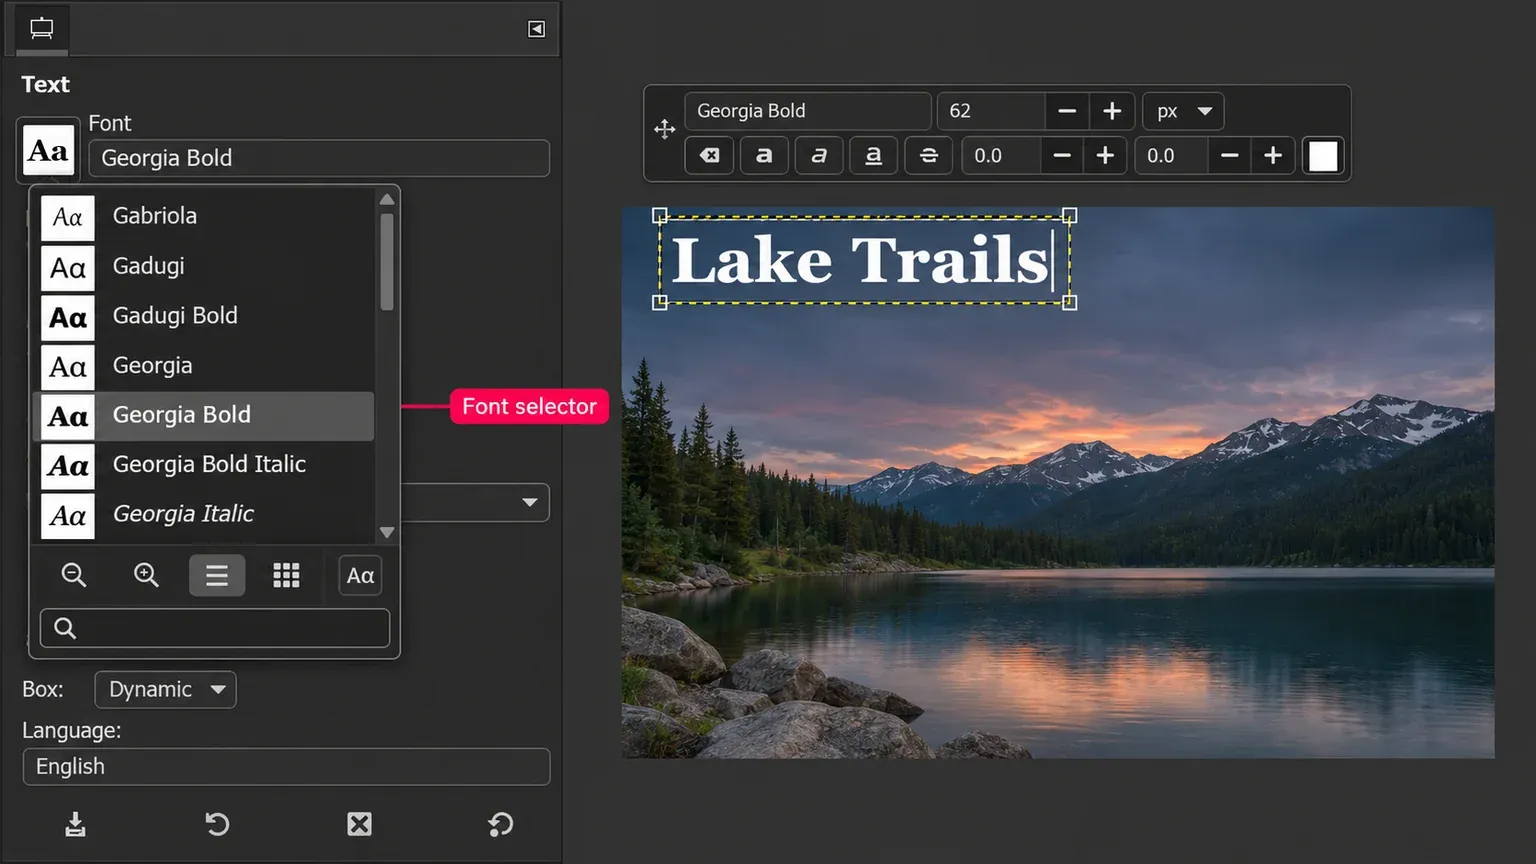
If a word resists the Tool Options change, highlight that word on the canvas and set its font there. To make the entire caption consistent, highlight all its characters and apply the intended font. I'd take that route before resetting styles because it leaves the other formatting controls available for deliberate adjustments.
Clear style of selected text removes all styling applied to that range, including changes you may want to keep. Use it only when you intend to remove those overrides and rebuild the formatting. The text context menu's Clear is more destructive: it deletes all text, selected or not. Neither command is necessary for an ordinary font swap.
When Tool Options itself is missing, open Windows > Dockable Dialogs > Tool Options, or double-click the Text tool's icon in the Toolbox. Reopening one dock is enough; resetting the whole workspace adds an unrelated change.
Check the layout before changing the size
A replacement font can occupy a different width and height at the same nominal size. Keep the original size first, then inspect the line endings, accents, descenders and distance from the image edges. Otherwise, a simultaneous size change makes it harder to judge what the new face needs.
The Text tool's Box setting controls wrapping:
- Dynamic: the text box grows with the text. A long caption can extend outside the image; press Enter where you want an explicit line break.
- Fixed: text wraps at the right edge of the box. A wider font can move words onto another line, and the resulting text can extend below the image boundary.
For a fixed caption area, drag a text-box handle to adjust the available width if the composition allows it. Enlarging the box doesn't reduce the font size. If the caption must fit the original space, choose the font and its intended weight first, then adjust size or line breaks with the whole caption visible.
Font, size and colour have separate controls. So do Bold, Italic, kerning and baseline offset. A face named Georgia Bold Italic already names a particular style; don't assume that selecting another family will produce the weight you intended. Inspect the lettering and choose the appropriate face from the available list.
I'd leave letter spacing and baseline adjustments until the font is settled, because those corrections depend on the shapes and line arrangement. If the caption also needs a border, add the text outline after choosing the font so you can judge the outline against the final letter shapes.
Recover text without throwing away the current appearance
In GIMP 3.2, destructive edits such as painting require Layer > Rasterize first. That converts a text layer into a normal bitmap layer. When the selected layer offers Layer > Revert Rasterize, GIMP can restore its previous layer type.
Revert Rasterize clears the destructive edits made after rasterising. The GIMP 3.2 release notes explicitly describe that loss. I'd save the current appearance in a separate XCF before reverting, so the painted or otherwise altered version remains available.
- Choose File > Save As… and save an XCF under a new filename before the reset.
- Reselect the original rasterised caption layer. Use Revert Rasterize only if that command is offered for it.
- Activate the restored text layer, choose the Text tool, select its characters and change the font.
- Compare with the saved earlier appearance. Keep the two project versions under different names if you need both.
If GIMP instead presents the text-editing warning with edit anyway, cancel and create a new text layer, choose the new-layer option when you need to preserve the altered original. That documented warning retains the old layer while making another from the stored text. Check which version is visible before judging the new font.
These recovery routes depend on retained text information. Lettering already flattened into a JPEG or ordinary PNG doesn't acquire editable words when you open it in GIMP or save it as XCF. Reopen the original layered project if available. Otherwise, replace the lettering with a new text layer and repair the old lettering's background as a separate image-editing job.
When the required font isn't in the list
Open Windows > Dockable Dialogs > Fonts. If you installed a font while GIMP was running, press Refresh font list to rescan the system fonts. The font list's context menu also offers Rescan Font List. A rescan discovers an available font; it doesn't install a font you haven't added.
If the face is still absent, follow the separate instructions to add fonts to GIMP. Once it appears, return to the existing caption, select the intended characters again and choose the face. Repeatedly changing the font name won't solve a missing installation.
Inspect symbols and accented letters as well as ordinary words. The selected font needs the required glyphs; a face suitable for the Latin title may not contain every character in a multilingual caption. Choose a suitable font for that range rather than replacing a missing symbol with a visually similar but incorrect character.
Save the editable caption and check the export
Save the project as XCF to retain its text and layer structure. XCF doesn't store undo history, so save the earlier project separately before a destructive reset. Keeping that master is what makes the next font or wording change possible.
Use File > Export As… for the finished image. A PNG can retain transparency and uses lossless compression, which is useful for standalone lettering. JPEG uses lossy compression and doesn't support transparency; check its letter edges against the intended background.
Open the exported file at its intended viewing size and check every line, symbol and edge. Confirm that the caption is inside the image, the chosen font is visible, and no old version shows through. Keep the XCF alongside the delivery file so the next correction starts with editable text.

Elena Morris
Elena Morris is the GIMP image-editing and compositing editor at TheGIMP.net. She writes about selections, masks and layers, restrained retouching, compositing and export.