GIMP animation: turn layers into a GIF or WebP
Build a loop from the bottom layer upwards. Set delay and disposal tags, check Playback, then preserve those settings when exporting GIF or WebP.
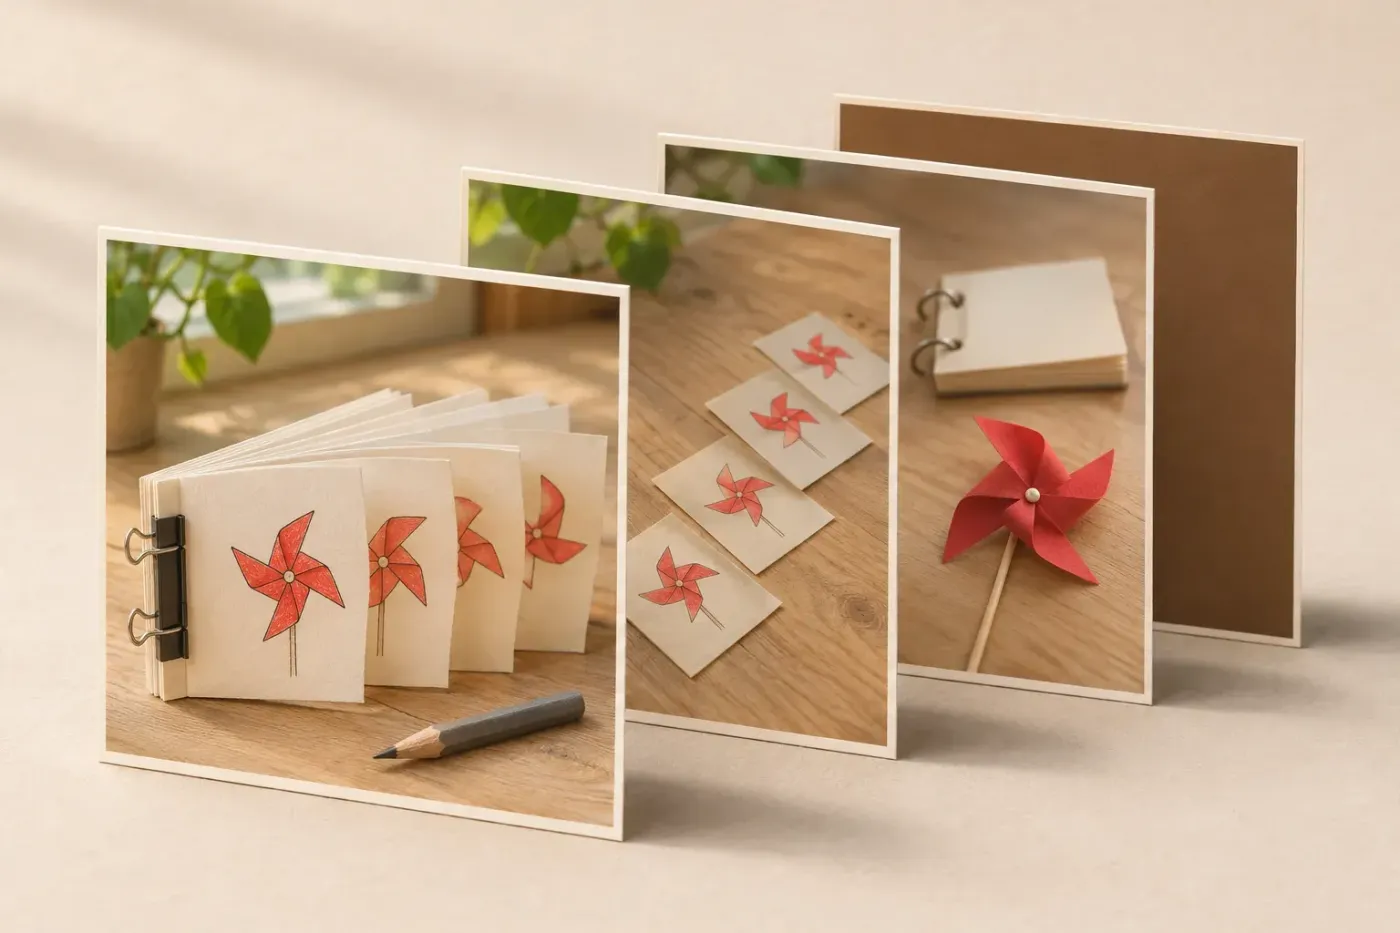
To make an animation in GIMP, put one complete frame on each layer, with the first frame at the bottom. Name the layers with timing and disposal tags such as Frame 2 (100ms)(replace), check Filters > Animation > Playback…, then export a GIF with As animation enabled. GIMP plays the stack from the bottom upwards.
I'd start with complete frames tagged (replace), because each new pose then clears the one before it. Keep an editable XCF and build a separate delivery copy; that leaves the original objects and backgrounds available when a pose needs changing.
Choose the file your destination accepts
A chat app that asks for a GIF needs a GIF, even if another format would suit the artwork better. For a web banner, check the site's accepted formats before building the frames. The tradeoff is in the pixels:
- GIF: useful when GIF is the required delivery format. GIMP exports all frames with one shared palette of up to 256 colours, so photographs and gradients can change noticeably. Transparency is fully on or fully off, rather than a soft alpha edge.
- WebP: a choice when the destination accepts it and the frames need more colour or soft transparency. Animated WebP supports lossy and lossless compression with transparency. You can keep the working image in RGB.
- APNG: GIMP 3.2 can load APNG but does not yet export it. Choosing a
.pngfilename will not make this stack into an APNG.
This is a frame-by-frame workflow for a short loop: you draw, assemble or import the poses. Layer names tell GIMP how to play those poses; they don't calculate the motion between them. You don't need GAP or another plug-in for this route. The built-in Animation filters also include specific generated effects, but an old tutorial's GAP commands are a separate workflow.
Keep only frames in the stack
Keep every pose inside the canvas and every intended frame on its own ordinary layer. A layer can have a different boundary from the image, so check the whole movement before trimming the canvas.
- Use ordinary layers, one finished frame per layer. Animation export expects layers as frames and advises against layer groups. A background layer and a separate object layer are two frames, not automatically one assembled pose.
- Remove spare backgrounds, reference images and abandoned poses from the export copy. The GIF exporter reads the whole layer list, including hidden layers. Switching off an eye is not a way to exclude a frame; Playback and animated WebP also read the full stack.
- Keep the artwork inside the canvas. Pixels beyond it do not extend the exported frame; GIF export can ask permission to crop layers that extend outside the image.
Save the source with File > Save As… and a distinct .xcf filename before removing spare layers or reducing colours. Keep the source objects editable there. A GIF is the delivery file, and its optimised layers may be awkward to revise.
If a pose uses separate background, object and text layers, assemble each visible scene into one frame in a second image. This is also the route I'd use for a moving object over a stationary background: every exported full frame needs both parts.
- In the source image, choose Select > None. Show the background and the first pose, and hide the other poses.
- Choose Edit > Copy Visible, which copies the visible layers as one combined picture. Use File > Create > From Clipboard to make the separate animation image.
- Return to the source XCF, hide the previous pose and show the next one, keeping the background visible. Use Copy Visible again. Switch to the animation image, select its top frame and choose Edit > Paste. In GIMP 3, Paste adds a new layer above the active layer.
- Repeat for the remaining poses without changing the source canvas size. Keep only the completed frame layers in the animation image, then give them the names, delays and modes described below.
For a first three-pose example, put an object near the left edge in the source, copy that complete scene, move the object to the centre for the second scene, then to the right for the third. Keep the same background and canvas throughout. To make it travel back rather than jump to the start, add the return poses before exporting. Merely enabling a loop repeats the existing last-to-first cut.
Build upwards from frame 1
If you already have separate frame files, open the first with File > Open…. With that image active, choose File > Open as Layers… for the next frame. Imported layers are added at the top of the current stack. Import the remaining files one at a time in sequence, checking that each new frame sits above the previous one.
If you are drawing successive poses in GIMP, start with your finished first frame open. Select its layer in the Layers dialog, choose Layer > Duplicate Layers, and change the artwork on the selected copy to make the next pose. Select only the frame you mean to duplicate: Duplicate Layers copies every selected layer. Repeat for the remaining poses, keeping one complete frame per layer.
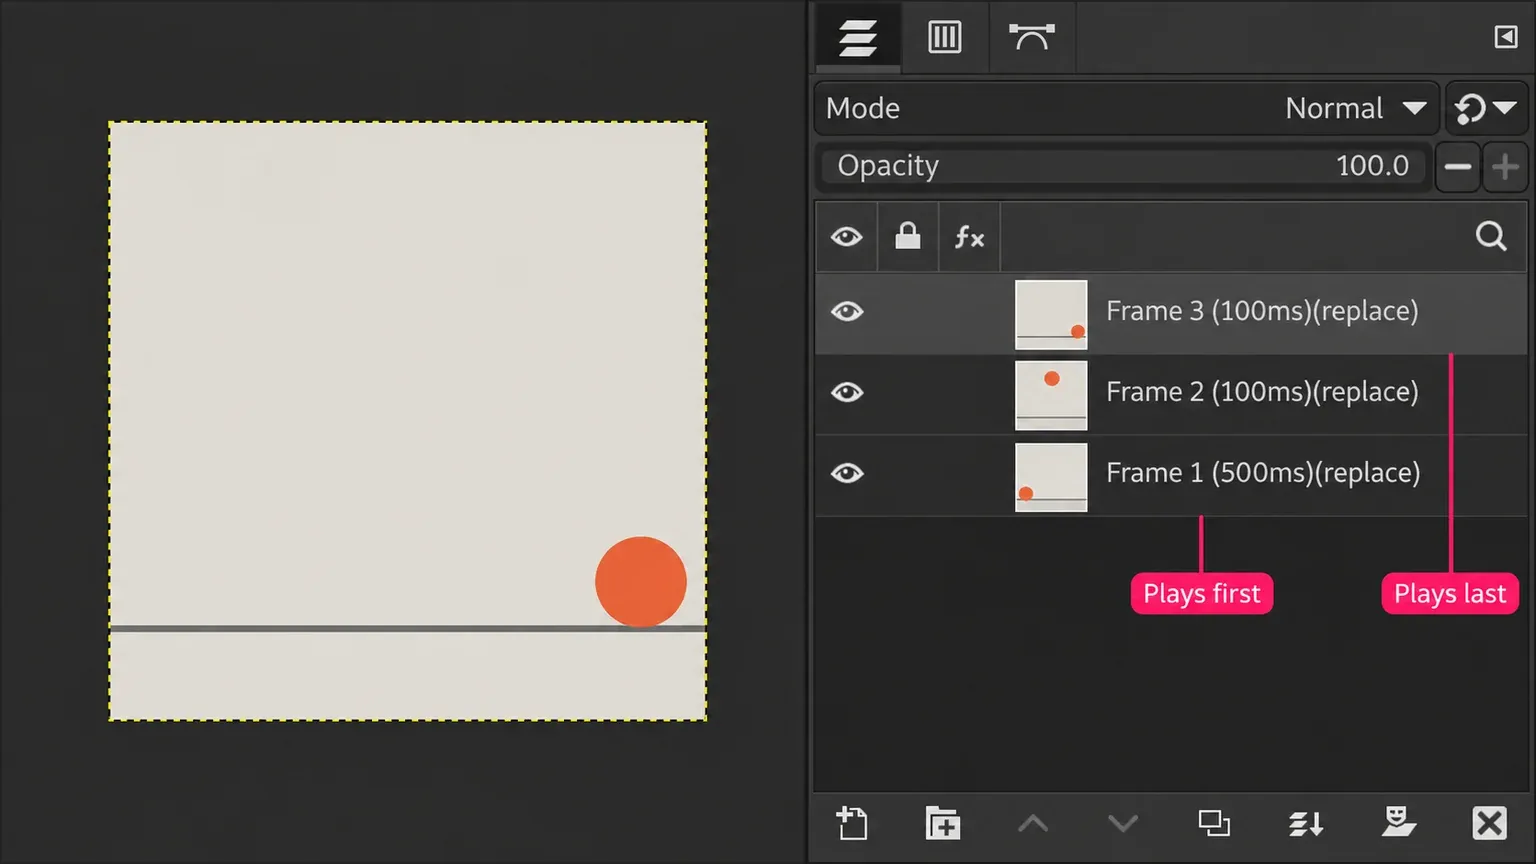
Check the order by looking from the bottom up. If the whole sequence is backwards, Layer > Stack > Reverse Layer Order reverses the stack. Use that for a completely reversed sequence; one misplaced pose only needs to be moved to its correct position in the Layers dialog.
A whole new frame or an addition to the previous frame?
(replace) discards the previous frame before displaying the new one. Use it for complete frames, including complete frames with a transparent background. Every frame must contain its own background if that background should remain visible.
(combine) puts the new layer over the image built by the earlier frames. Its transparent pixels leave earlier pixels visible. That works for deliberate additions, such as revealing a drawing stroke by stroke. For an object moving across a clear background, it can leave a trail of old positions. Start with (replace) for separate poses; let optimisation create smaller change layers later.
Put the delay and mode in every layer name
Double-click the layer name in the Layers dialog to rename it. Use this pattern, ending the name with the lowercase mode tag:
Frame 1 (500ms)(replace): hold the first pose for half a second.Frame 2 (100ms)(replace): display the second pose for a tenth of a second.Frame 3 (100ms)(replace): display the third pose for a tenth of a second.
These are example holds, not a required frame rate. They total 700 ms per cycle: 500 + 100 + 100. With every frame set to 100 ms, ten frames occupy one second. A longer delay holds a pose; extra poses change the shape of the motion. Slowing three widely separated poses won't supply the missing positions between them.
Write (200ms) with no space between the number and ms. The manual's spaced example, (200 ms), is accepted by Playback but isn't parsed as a delay by the GIMP 3.2.8 GIF exporter; the WebP exporter uses the same restriction. A correct-looking preview can therefore conceal wrong export timing. Write Frame 2, rather than Frame (2), before the delay: both exporters stop at the first parenthesis that starts with a digit.
Keep (replace) or (combine) lowercase and at the very end, with no text after it. Playback requires that final position. After duplicating a named frame, rename the copy again: the added copy or number can otherwise sit after the mode tag.
Read the loop in Playback before exporting
With the layered image active, open Filters > Animation > Playback…. In the Playback window, the frame counter sits below the preview beside the player controls.
- Choose Rewind the animation, then Start playback. Watch the transition from the last pose back to the first as carefully as the motion between them.
- Use Stop playback, then Step to next frame or Step back to previous frame to inspect an unexpected jump. Match its frame number to the corresponding layer, counted from the bottom.
- After changing the layers or their names, use Reload the image in Playback to read the edited stack again. Leave playback speed at its normal setting when judging your chosen delays.
An old pose lingering behind a new one points to (combine) or an untagged layer. An unwanted blank or reference frame points to a spare layer, even if it is hidden. Check that Playback's frame total matches the stack you meant to export. Fix names and layers before using preview controls to judge the result; the preview's mode and speed settings don't replace the export settings.
Make the delivery copy smaller without losing the motion
Save the editable XCF before reducing dimensions or colours. Work in a separately named copy if you want to keep the larger RGB version available.
Use Image > Scale Image… to reduce every frame together. Keep the Width/Height chain linked to preserve proportions, set the intended pixel dimensions and click Scale. Scale Image changes the pixel content and the canvas together. For hard-edged pixel art, Interpolation > None uses nearest-neighbour sampling; for other artwork, choose an interpolation method suited to its edges.
Image > Canvas Size… changes the boundary, rather than shrinking the picture. Reducing it cuts the visible area, so use it only to remove empty margins after checking every pose. Do not trim to the first frame's outline if the object later moves outside that area.
You can also remove redundant poses, then adjust the remaining delays to preserve the intended pauses. Judge the new movement in Playback; fewer frames are only useful if the loop still says what it needs to say.
For GIF, decide what the palette may sacrifice
GIF uses 8-bit integer precision. GIMP normally converts a higher-precision copy automatically during export. To inspect that change before exporting, choose Image > Encoding > 8-bit integer in the delivery copy before converting to Indexed. Confirm the conversion with Non-linear channel encoding for this 8-bit copy. Keep the higher-precision source XCF for future editing.
GIMP can convert RGB during GIF export, but Image > Mode > Indexed… gives you control beforehand. In the Indexed conversion dialog, choose Generate optimum palette, set Maximum number of colors, choose colour dithering and click Convert. Lowering the colour count can simplify a small graphic, but it can also band a smooth gradient.
Compare the important edges and colour transitions after conversion. The manual describes Positioned colour dithering as suited to animations; it is a candidate to compare, not a guarantee of a clean result. GIF cannot retain partial transparency. If a soft edge matters and the destination accepts WebP, keep the RGB copy for that export instead.
For transparent frames, check the edges against a dark and a bright temporary background, as in the guide to transparent backgrounds that survive export. Then select those temporary background layers and choose Layer > Delete Layers in the delivery copy. Delete them before Playback and export; hiding them leaves extra frames.
Optimise the checked sequence
Choose Filters > Animation > Optimize (for GIF). GIF optimisation keeps changed regions instead of repeating shared pixels. It creates a new image, so keep the original open and export the optimised image. Run Playback on that new image first.
The optimised layers can have (combine) names and smaller boundaries. Keep those names: forcing every layer to (replace) discards earlier pixels that the change layers depend on. The size saving depends on how much the frames share; it isn't a fixed percentage.
For a later artwork revision, return to the original full-frame XCF. If only an optimised stack is available, use Filters > Animation > Unoptimize to rebuild complete frames before editing. Preview the revised sequence, then optimise a fresh delivery copy.
Export the GIF with animation switched on
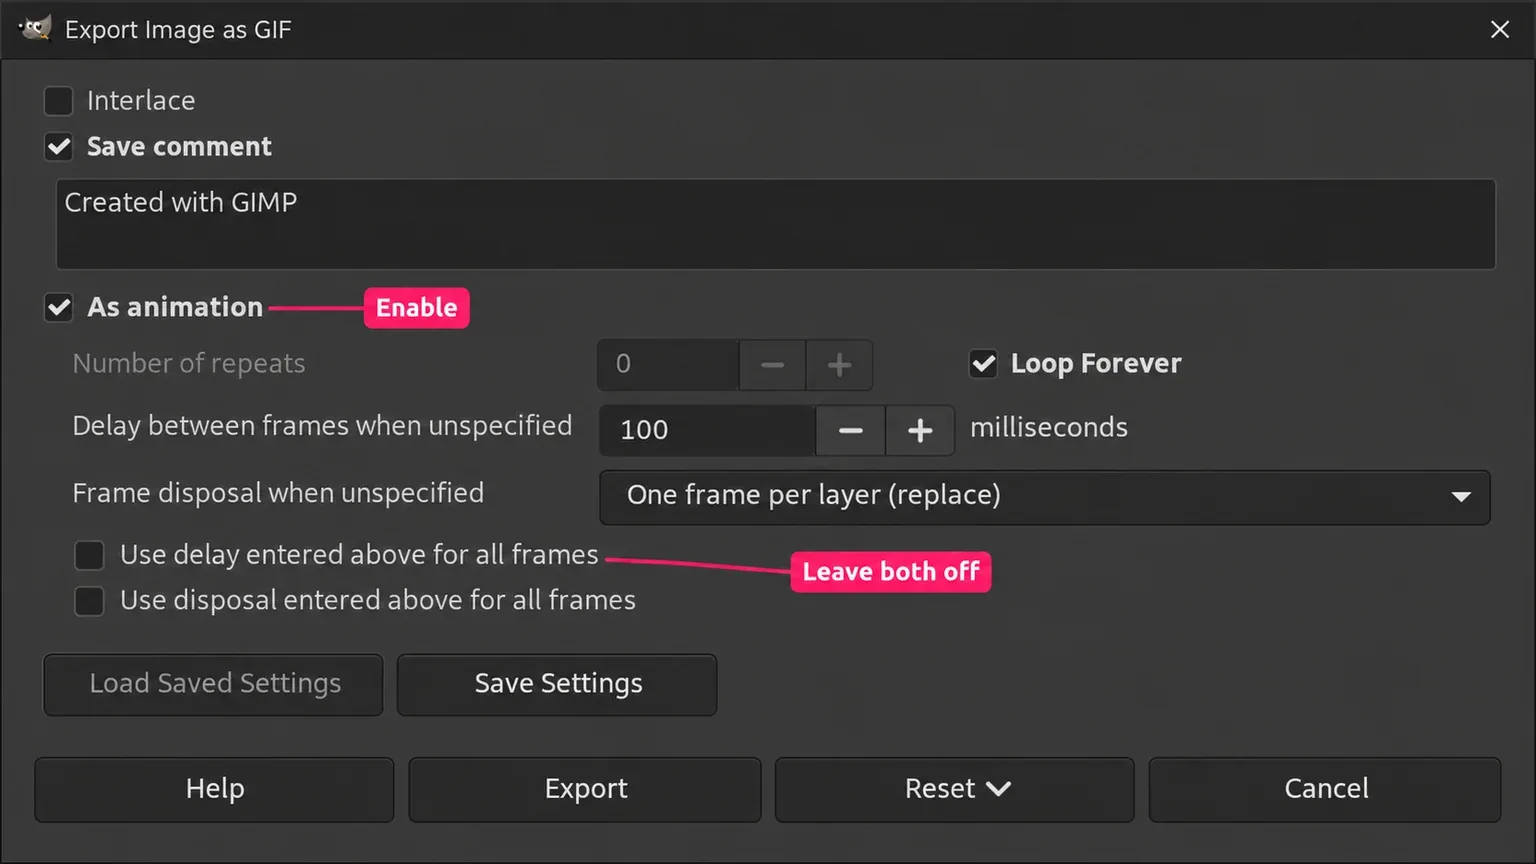
With the intended original or optimised image active, choose File > Export As…. Enter a filename ending in .gif, choose the destination folder and click Export. In the GIF export options:
- Enable As animation. If it is disabled, the image has only one layer. You need multiple frame layers in the image you are exporting.
- Enable Loop Forever for a repeating loop. For a limited repeat, disable it and set Number of repeats.
- Set Delay between frames when unspecified as a fallback, and set Frame disposal when unspecified to One frame per layer (replace) for complete frames. An optimised image may deliberately use cumulative change layers; keep its layer tags.
- Leave Use delay entered above for all frames and Use disposal entered above for all frames off when your names carry the intended timing and modes. These boxes override the names. In particular, forcing replace onto an optimised sequence can break it.
- Click Export to write the file.
GIF stores delays in 10 ms units; GIMP rounds to the nearest unit. Use positive delays such as the examples above, rather than zero. A destination app can also apply its own playback limits, so judge the exported file where it will be used.
Use the WebP route when colour and alpha matter
Choose File > Export As…, enter a .webp filename and click Export. In the WebP export options, enable Save animation, then enable Loop forever for a loop.
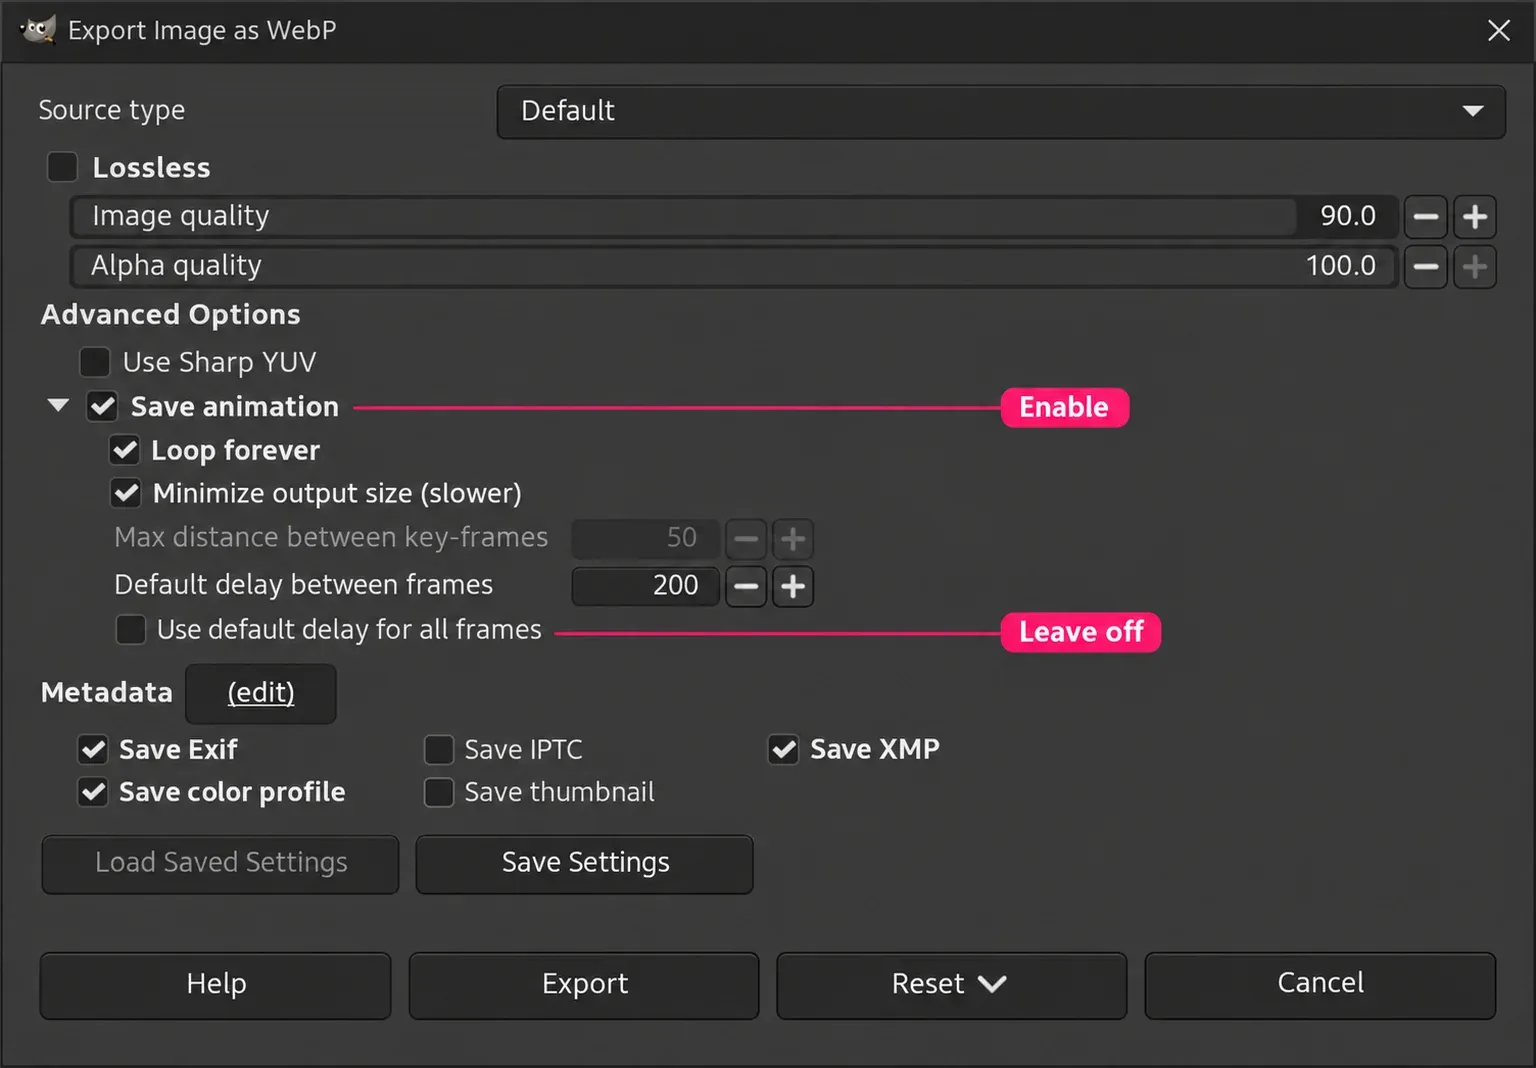
Set Default delay between frames as the fallback. Leave Use default delay for all frames off to retain the layer timings. Enable Lossless to avoid lossy compression; otherwise use Image quality and Alpha quality for the lossy export. Minimize output size (slower) is available if you are willing to spend more export time reducing the file. Click Export.
Check the exported file, then the destination
Reopen the saved GIF or WebP with File > Open… as a separate image and run Playback on that imported stack. Check the first pose, any deliberate pause and the last-to-first transition. An optimiser may combine redundant identical frames, so compare the visible sequence and timing rather than expecting an identical editable layer structure.
Then open or upload the export where it will be used. Check movement, colours, transparent edges and the repeat behaviour there. If the local export is correct but the receiving app shows a still or a different speed, check that destination's animation support and upload processing before rebuilding the XCF.
If the exported loop behaves differently
- It is a still image: return to Export As… and enable As animation for GIF, or Save animation for WebP. With GIF animation off, GIMP merges the visible layers into a still.
- The timing differs from Playback: check for
(200 ms), an earlier bracketed number such asFrame (2), or a timing override enabled in the export options. - Old pixels trail the subject: check the
(combine)/(replace)tags and the disposal override. Complete poses and optimised change layers need different treatment. - GIF colours or edges change: inspect the indexed palette and the one-bit transparency limit. Retain the RGB copy if WebP is an accepted alternative.
- GIF export rejects the image precision: return to the delivery copy, choose Image > Encoding > 8-bit integer, then prepare its Indexed palette. Preserve the source XCF at its original precision.
- A blank frame appears between poses: delete spare background, reference and hidden layers from the delivery stack. If a background and an object are separate frame layers, assemble them into complete scene frames first.
Fix the stack, palette or export option responsible, write a new delivery file and check that file again. Keep the editable source XCF as the starting point for the next revision.

Elena Morris
Elena Morris is the GIMP image-editing and compositing editor at TheGIMP.net. She writes about selections, masks and layers, restrained retouching, compositing and export.