Remove white lines and streaks from a scanned image in GIMP
Repair narrow streaks with Heal or Clone, repeated vertical bands with Destripe, and faint paper marks with Levels. Check scanner dirt before retouching every file.
To remove a narrow white line from a scanned photo in GIMP, use Heal on a duplicate layer, sampling clean texture beside the damage; switch to Clone where the line crosses a sharp edge. Use Destripe for repeated vertical bands and Levels for faint grey marks on pale paper. I'd rescan first when the original is available and the mark keeps returning: a clean scan can retain detail that a brush has to replace.
Check whether the line belongs to the scan
Before painting, switch off View > Show Guides, View > Show Grid and View > Show Layer Boundary. These control guides, the grid overlay and the layer's dotted boundary. A line that disappears with one of those controls needs no retouching. Turn back on any display aids you still need.
For a real defect, compare another scan and inspect the original. A mark at the same position on different pages is a reason to check the scanner; a mark visible on the original is a reason to examine that print or film. These are clues, not a complete diagnosis. If a lab supplied the scans and the negatives look clean, ask for a rescan before spending hours replacing texture.
Follow your scanner model's cleaning instructions. For Epson's V19 II and V39 II flatbeds, the first checks include the glass and document mat. Epson's FastFoto feeder instructions warn that dust on photos can produce white lines and damage their protective coating. The permitted cloth, cleaner, access points and power steps depend on the model; don't substitute a solvent suggested in a forum. If cleaning according to the manual doesn't solve a recurring defect, use the maker's support route.
Choose a method by the detail you need to preserve
| What you see | Start with | Reject the repair if… |
|---|---|---|
| One or two narrow streaks through sky, skin or paper texture | Heal, in short sections | A soft patch or repeated texture replaces the line |
| A streak through a roof, frame, letter or regular pattern | Clone from a matching intact edge | The edge bends, doubles or breaks |
| Repeated vertical light/dark bands across the scan | Destripe preview | New bands appear or genuine vertical detail changes |
| Scattered small scratches among otherwise usable texture | Median Blur inside a local selection | Grain vanishes, corners round off or fine lines shrink |
| Faint grey marks in pale paper | Levels, with close attention to pale ink | Pencil, stamps or thin strokes disappear |
| Tiny white holes inside dark ink | A local Erode pass on a copy | Letters join, gaps close or black specks grow |
A white scratch and a pale band aren't interchangeable. Brushing replaces pixels using another part of the image. Destripe adjusts a repeated vertical pattern, while Levels changes tone. Neither filter can know what a missing letter, eye or unique ornament originally looked like. Where important detail is absent and no matching source exists, keep that limitation visible rather than inventing it.
Keep an untouched layer and a saved project
- Open the scan and select only its pixel layer in the Layers dock. Click the image thumbnail rather than a mask thumbnail.
- Choose Layer > Duplicate Layers to make a working copy. Name the upper copy Scan repair and leave the original underneath.
- Choose Select > None to clear an old selection. Keep the repair layer selected.
- Use File > Save As to save an XCF under a new name. XCF keeps the layer structure; the imported scan file stays separate.
Work close enough to see the streak's edges, then inspect at 100% and at the intended viewing size. Switch the repair layer's eye off and on to compare it with the original underneath. Save as you go: XCF preserves the image structure, but it doesn't store Undo history.
Heal a narrow white streak
Heal takes the destination's surroundings into account rather than simply copying the source colour. That makes it my first choice for a small streak across continuous texture. A line running from sky into a dark roof needs separate repairs on each surface.
- Press H. In Tool Options, choose a brush and set Size just wider than the streak. A brush narrower than the damage leaves white edges; an oversized one replaces more detail than necessary.
- Set Alignment to Aligned. Keep Sample merged off for this workflow, since you're sampling and painting on the same duplicate.
- Ctrl-click a clean area beside the streak to set the source. On macOS, use the source-setting modifier shown in the status bar; look for the crosshair cursor. Choose similar texture and brightness, with enough clean space for the whole upcoming stroke.
- Release the source-setting key. Click the start of a short, straight section of damage, then hold Shift and click its other end. The Shift stroke joins those two points. For a curved scratch, use short strokes that follow its shape.
- Release Shift and inspect. If you see a blotch or an obvious repeat, use Edit > Undo, choose a better source and shorten the repair. Reset the source before changing to a different surface.
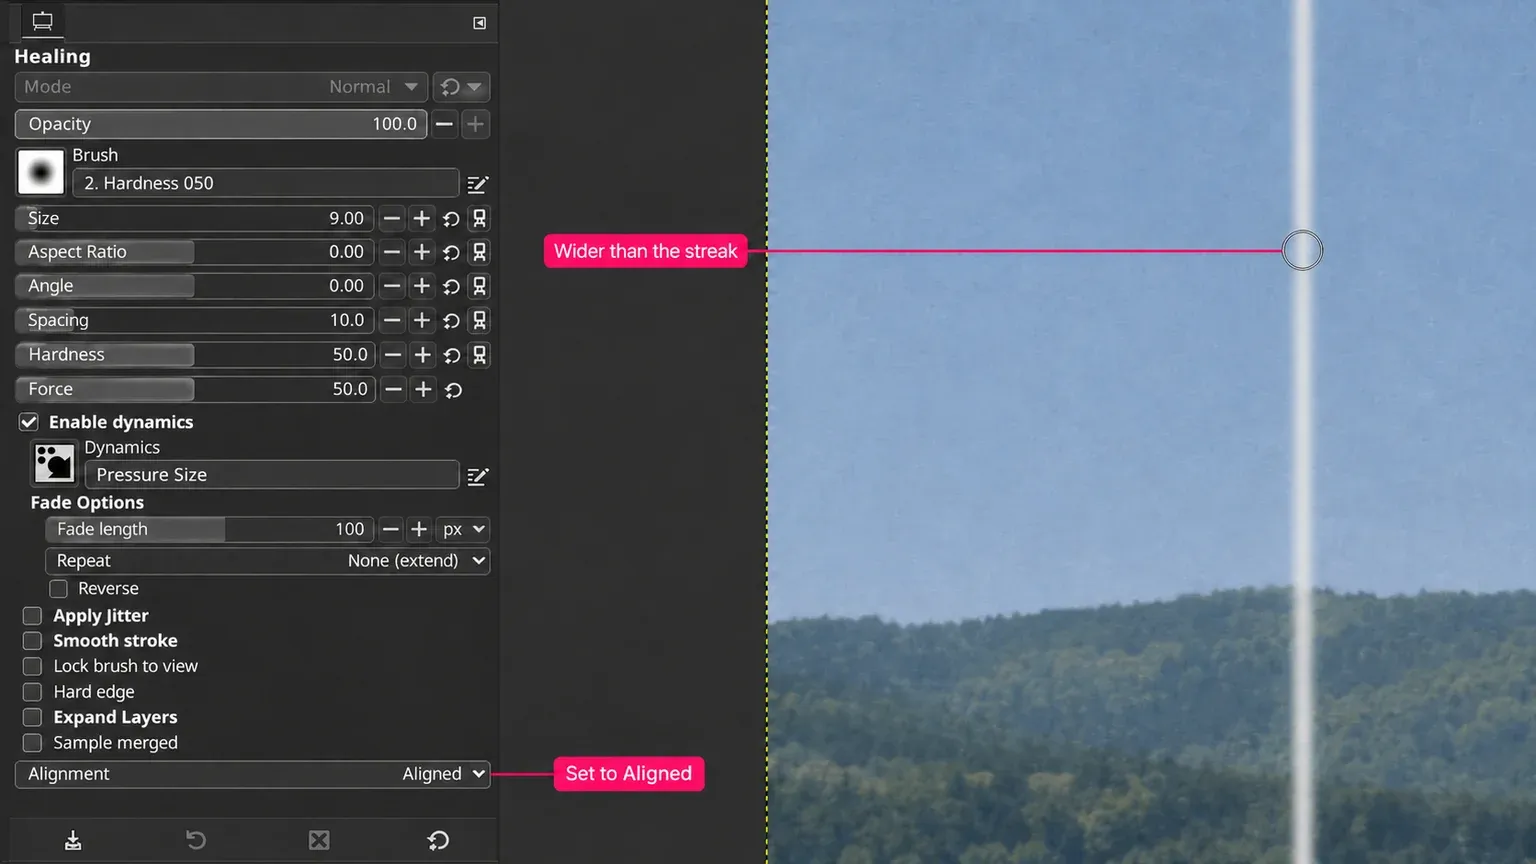
Watch the source marker as well as the brush. With Aligned sampling, the source follows at a fixed offset: a clean starting point isn't enough if the rest of its path crosses the white line, a face or an unrelated edge. Repeatedly dabbing the same patch can also leave a muddy mark. Undo a poor stroke instead of trying to bury it under more strokes.
Use Clone to continue an edge
Where the streak cuts a window frame, roof line or other hard boundary, press C, set Source to Image and Alignment to Aligned. Sample an intact part of the same edge with the source-setting modifier, release the key, then paint a small section of the damaged edge. Clone copies pixel data, so the source must match the edge's angle, position and thickness.
Start where the damaged edge meets an intact section; check that the continuation joins cleanly before extending it. Treat the texture on each side separately. A little Heal can soften a remaining texture seam away from the edge, but don't brush over the newly aligned boundary. The object-removal guide covers this combination across larger repairs.
For a few horizontal white streaks, the same local Heal and Clone method applies. Destripe's documented target is vertical banding, so I'd avoid applying it indiscriminately to horizontal damage. If the whole scan is covered in bands, a corrected rescan deserves priority over a long sequence of brush strokes.
If Heal or Clone won't paint
Check the active target first: the visible Scan repair pixel thumbnail, not its mask or the original. Clear an unwanted selection with Select > None, check the layer's Lock pixels setting, and make sure the repair lies inside the layer. Then check brush opacity, size and dynamics and set the source again. If tablet dynamics make the brush unexpectedly faint or small, disable Enable dynamics while diagnosing it. Clone stops making changes when its source travels outside the source image.
To restore a missing options dock, double-click the tool icon or open Windows > Dockable Dialogs > Tool Options.
Reduce repeated vertical bands with Destripe
In GIMP 3.2, open Colors > Tone Mapping > Destripe. In GIMP 2.10, the route is Filters > Enhance > Destripe. The current filter calculates a compensating pattern from vertical elements in the image. It can reduce banding, but it isn't a reconstruction tool for a blank stripe containing lost detail.
- Keep Preview enabled and examine a banded area. Use the preview's scroll bars to check other parts of the scan.
- Adjust Width gradually, stopping at the lowest setting that gives a useful reduction. The documented range is 2–100; values above 60 are rarely needed and may cause artefacts. A value in an example image isn't a preset for every scanner.
- Inspect a genuine vertical feature too: fence slats, window frames or upright letters. Cancel if the correction adds stripes or damages those features.
- Accept a useful result. If a stripe remains, the manual recommends a rectangular selection around it before applying the filter again; other selection shapes may worsen the result. Compare that retry with the original and keep it only if it improves the scan.
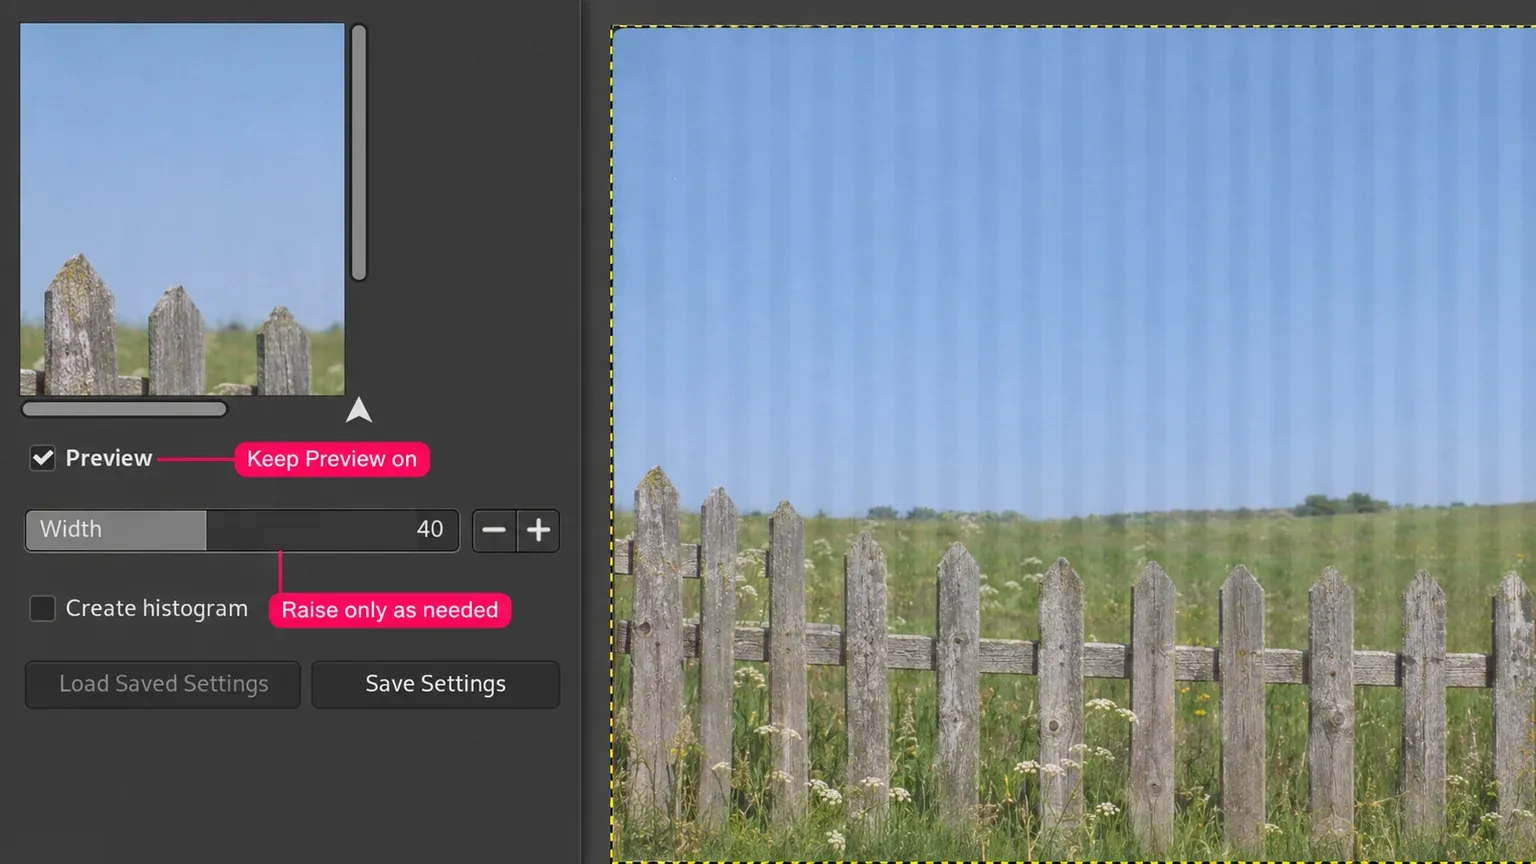
Leave Create histogram off for a normal repair: it creates a black-and-white view of the compensating pattern. More Width isn't automatically better. Once new bands appear, back off or cancel and use a local repair for the remaining defect.
Treat scattered fine scratches locally
Filters > Blur > Median Blur can suppress small scratches and isolated noise, but it also changes texture. The Median Blur documentation shows why increasing Radius can round corners and erode convex shapes. I keep this adjustment local so a cleaner patch of sky doesn't cost the rest of the photograph its grain.
- On the repair copy, use Rectangle Select to enclose a small damaged area. Start with a patch where you can recognise the useful detail.
- Open Median Blur. Keep Percentile at 50 for an ordinary median adjustment and begin with a small Radius. Increase it only until the fine defect is reduced.
- Use Preview or Split view to compare texture. In the standard vertical split, the filtered result is on the left and the unfiltered image on the right.
- Inspect the selection boundary. With an active selection, Use the selection as input samples inside that selection; Use the entire layer as input can sample surrounding layer pixels while still changing only the selected output. Choose the latter if the selection's edge is affecting the calculation.
- In GIMP 3, leave Merge filter off if you want to retain an adjustable layer effect. After accepting, choose Select > None and check the whole picture.
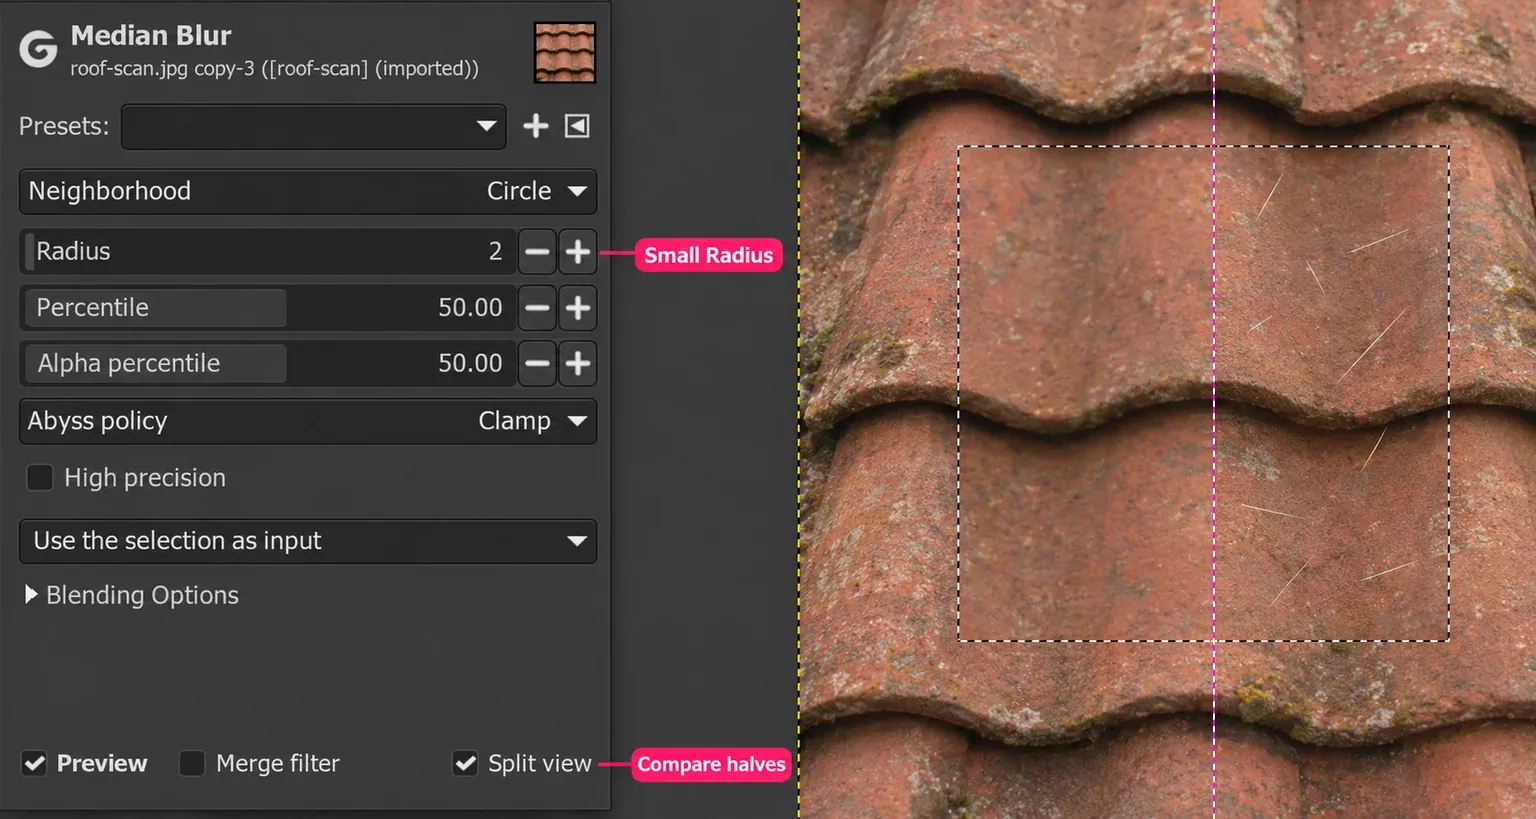
Those selection-input and layer-effect controls belong to GEGL filters such as Median Blur; don't expect the older Destripe dialog to have the same options. Reject a median repair that removes eyelashes, fine lettering or film grain, even if the scratch becomes less obvious. A short Clone or Heal stroke is a better next attempt for that patch.
Clean pale paper without erasing the writing
Use Levels when the unwanted marks are faint grey tones against light paper. A pure white cut through black ink needs replacement detail; moving a tone slider won't recover it.
- Select the repair copy, or select only a paper area that needs cleanup.
- Open Colors > Levels and keep Channel at Value.
- Under Input Levels, move the right-hand white-point triangle a little to the left. Tones at that point and brighter become white. Use this upper input control, not the white slider under Output Levels.
- Watch the faintest meaningful mark as you adjust: a pencil annotation, light stamp, hairline or thin part of a letter. Stop before it fades, even if some paper texture remains.
- Compare the entire page before accepting. If different areas need different amounts of cleanup, use separate local adjustments instead of forcing one setting across the page.
Colors > Threshold is an option for an intentionally black-and-white copy, but it removes the original anti-aliasing. Check small characters and punctuation closely. For calligraphy or a scanned drawing that needs a transparent background, use the separate white-background removal workflow; whitening paper alone doesn't make it transparent.
Fill tiny white holes in dark ink with restraint
For small pinholes inside a black stroke, select that local area on a copy and try Filters > Generic > Erode once. Erode expands dark areas, which can close a small hole but also thickens letters and enlarges dark specks. Inspect the spaces inside letters and between neighbouring strokes before repeating it.
A long white gap through writing is a different problem. If its shape isn't recoverable from the original or a clearly matching intact section, rescanning is preferable to guessing the missing characters. Keep the untouched scan, and check any OCR output against the actual writing after cleanup.
For a folder of scans, diagnose before repeating settings
First inspect a few different files: a light page, a dark photo and one with fine detail, where those occur in the set. Check whether the defect stays in the same position and whether it crosses different subjects. A repeated scanner defect may justify correcting the scanning process and rescanning the set; a fixed brush source won't suit changing content.
For similar pages, a saved Levels or Median Blur preset can be a starting point, but preview it on the next page before accepting it. A setting that clears one sheet can erase a paler annotation on another. Keep outputs in a separate folder and retain the originals. If automatic repair creates as much inspection work as a new scan, I'd stop there and fix the capture.
Check the repair, then export a new file
At 100%, follow the repaired line from end to end. Look for repeated source texture, broken edges, a softened strip and a visible selection boundary. Then check at the size people will view or print. A technically hidden streak isn't an improvement if it leaves a more noticeable patch.
Save the layered XCF again, then use File > Export As with a new filename. Choose PNG for a lossless image copy: its compression level doesn't discard image detail. JPEG is useful for a smaller photographic delivery, but repeated JPEG export and editing loses detail, so return to the XCF for later changes. Export the visible repaired composition without flattening your working project.
Open the exported file and inspect the same repaired edges, paper tones and fine writing. This final check catches a poor delivery setting or the wrong visible layer before you share the scan.

Elena Morris
Elena Morris is the GIMP image-editing and compositing editor at TheGIMP.net. She writes about selections, masks and layers, restrained retouching, compositing and export.