Change the background colour in GIMP
Choose a colour fill for a new canvas, fill a selected plain backdrop, or place a separate colour layer beneath a masked subject. Keep the XCF before exporting.
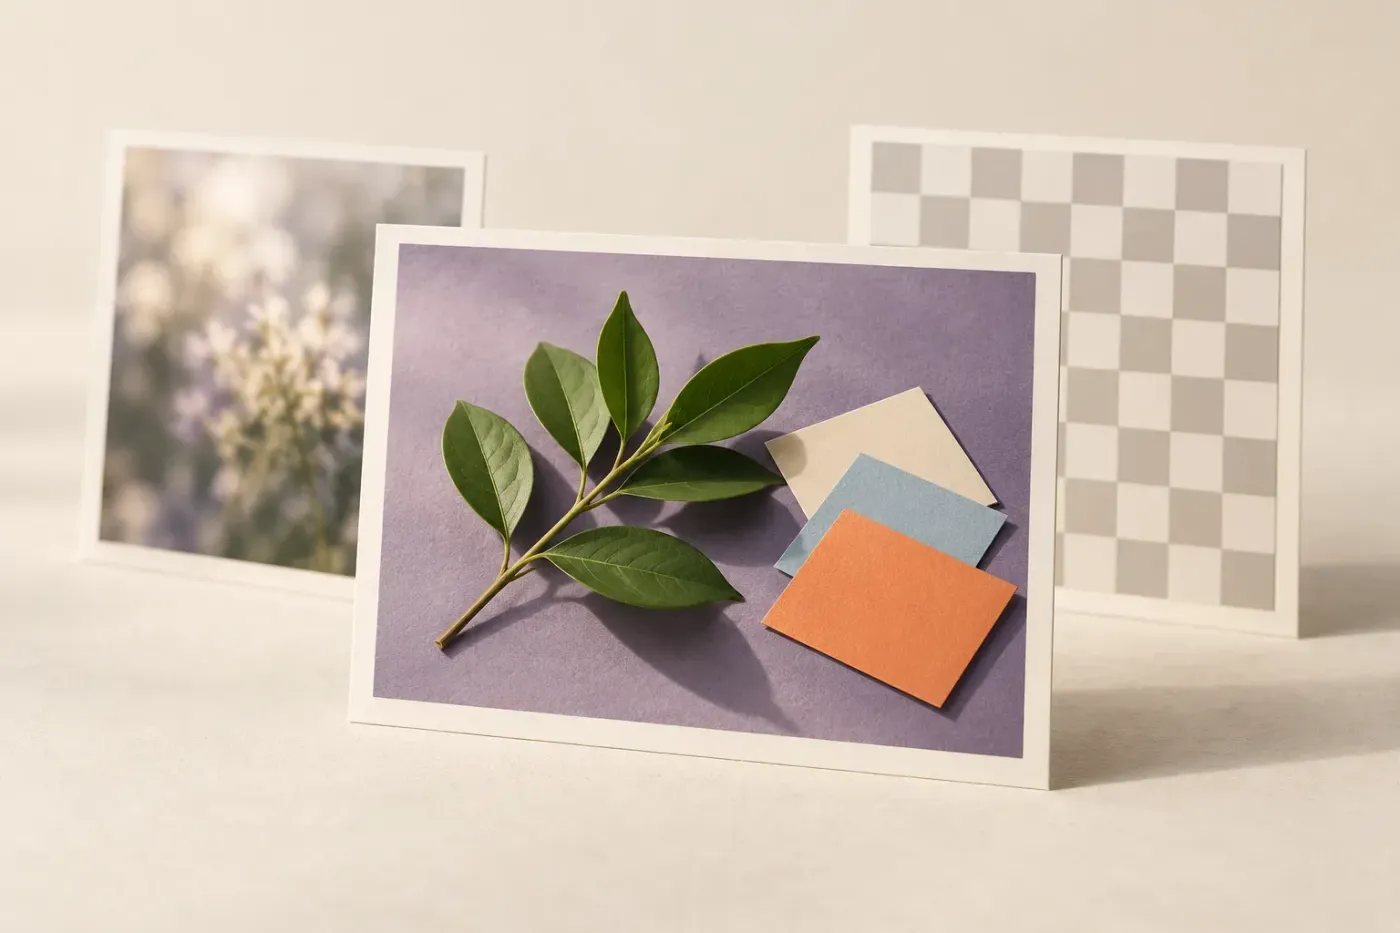
To change the background colour in GIMP, put a solid colour layer underneath a subject whose old background is transparent or hidden by a mask. Select only the new background layer to change its colour again with Edit > Fill with FG Color. If you're starting with a flat photograph, separate the subject first; an opaque photo will hide any colour placed below it.
I'd keep the cut-out subject and the colour on separate layers because the next colour change then takes one fill, with the edge still available for repair. A photographed backdrop with useful shadows needs a different approach: adjust its colour inside a selection instead of replacing every tone with a flat fill.
Choose between replacing the backdrop and tinting it
| What you have | Use this route | What stays adjustable |
|---|---|---|
| A PNG cut-out or a subject already masked | Add a colour layer underneath | The subject edge and the solid colour remain separate. |
| An opaque photo with a background you want to replace | Make a subject mask, then add colour below. | The mask can hide or restore the original pixels. |
| A plain backdrop that needs a uniform new colour | Select and fill the backdrop on a copy. | The original photo remains available underneath. |
| A coloured wall or fabric with shadows and texture | Adjust its hue inside a selection. | The photograph keeps tonal variation instead of becoming a flat block. |
| An empty document | Choose the starting fill in File > New. | You can add the subject on another layer. |
The Toolbox's foreground and background swatches are colours supplied to tools. A layer named Background is part of the picture. Neither swatch automatically repaints that layer when you change the swatch. If you mean the grey surround outside the picture, jump to the window-background setting; that setting doesn't alter the exported image.
Add a solid colour beneath a transparent subject
Open the picture with File > Open and look at its Layers dock. Hide any existing backdrop layer using its eye icon. With the default transparency display, checkerboard should appear around the subject. A white rectangle in the photo is opaque white, even if the file is a PNG; the file extension alone doesn't tell you whether the surround is transparent.
Save a separate XCF working copy before the edit. If the old scene is still attached to the subject, use the mask steps below before adding the colour.
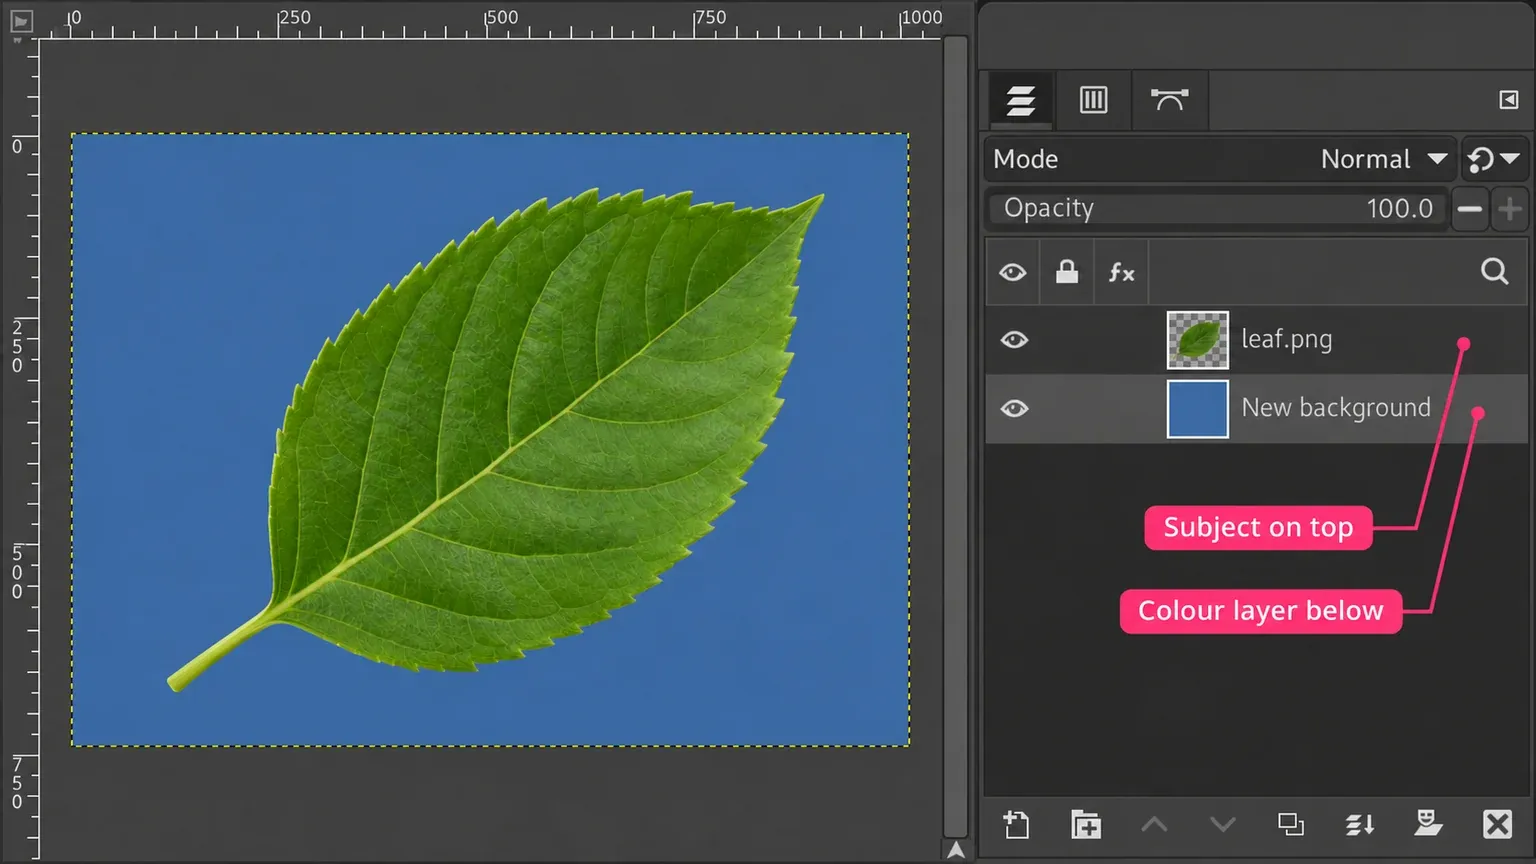
- Click the foreground-colour swatch in the Toolbox and choose the replacement colour. The colour area opens a selector when you click a swatch; choosing the colour doesn't fill the image yet.
- Choose Select > None to clear any leftover selection. In the Layers dock, select just one subject layer.
- Open Layer > New Layer…. Name it New background, leave Width and Height at the image dimensions, and keep the offsets at zero.
- Set Fill with to Foreground color. Keep Mode at Normal, Opacity at 100%, and the layer visible. Confirm with OK.
- Drag New background below the subject in the layer stack. The subject should now appear over the colour. Keep any unused opaque original photo hidden.
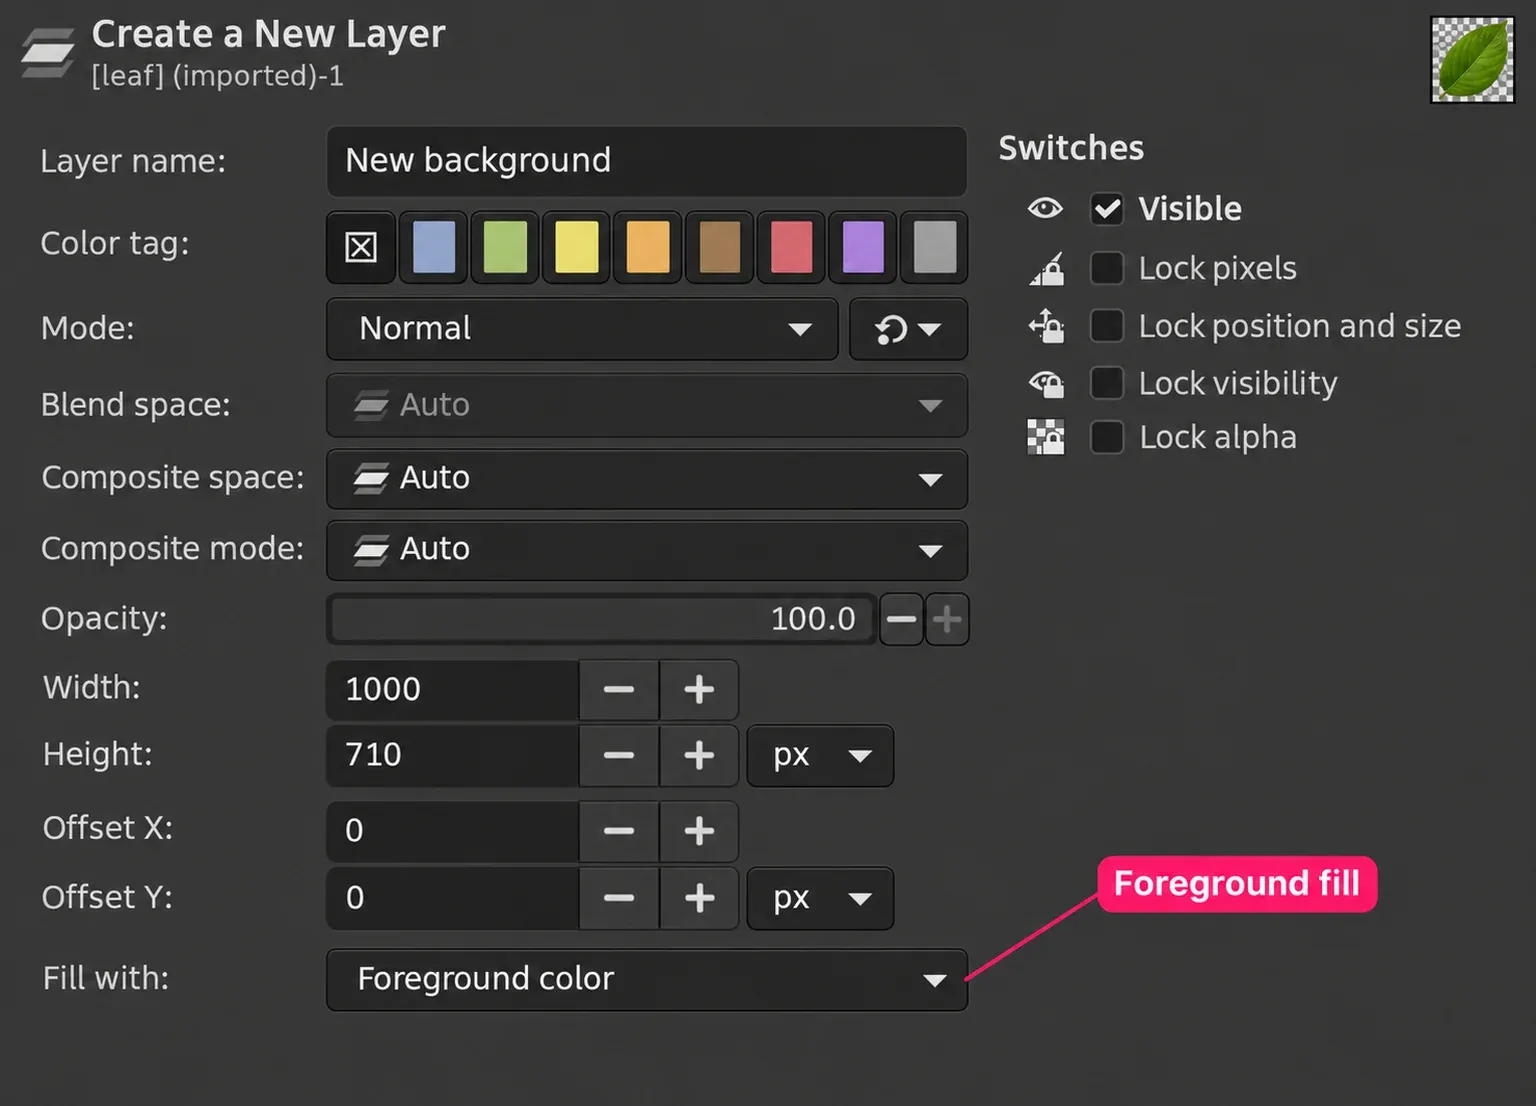
GIMP's New Layer command creates a layer above each selected layer. Selecting one layer avoids making several backgrounds, and moving the fill below the subject is an essential step. If the command says To New Layer, convert the active floating selection with that command, then open New Layer again.
Change that colour again, including white or black
Select the New background layer's image thumbnail, choose another foreground colour, clear the selection with Select > None, then use Edit > Fill with FG Color. The foreground-fill command fills the selected area, or the entire selected layer when there's no selection. Repeat that sequence whenever you want another backdrop.
For white, choose white in the colour selector; for black, choose black. If you set the background swatch instead, use Edit > Fill with BG Color. GIMP's background-fill command uses that second swatch. You don't need Bucket Fill for this whole-layer replacement.
If the photo is opaque, make a subject mask first
A colour layer can't show through an opaque photo. Adding an alpha channel makes transparency possible, but doesn't remove any of the existing background. A mask gives you a repairable boundary while retaining the photo's pixels.
For a simple, nearly uniform backdrop around a distinct subject, this is the shortest complete mask route:
- Select only the photo layer and choose Tools > Selection Tools > Fuzzy Select. Keep Sample merged off to sample that layer alone.
- Click the old background. Adjust Threshold until the selection includes the backdrop without spreading into the subject. Use the tool's Add to the current selection mode for disconnected background areas, including enclosed gaps such as a mug handle.
- Choose Select > Invert, so the subject is selected. Right-click the photo layer and choose Add Layer Masks….
- Set Initialize Layer Mask to to Selection, leave Invert mask unchecked, and click Add. Then choose Select > None.
- Hide any original background layer underneath. Confirm that the mask reveals the subject and hides its surroundings, then add the colour layer below.
Fuzzy Select follows connected similar colours; it doesn't recognise a person or product. When the subject shares the background colour, a larger threshold can select both. Hair, fur, glass and busy scenes need more careful isolation. Use the tool-choice and edge-repair steps to remove a background in GIMP, then return here for the replacement colour.
Check the mask's polarity before moving on. With Selection initialisation, selected areas stay opaque and unselected areas become transparent. If you selected the backdrop and skipped Invert, the mask keeps the wrong part of the photograph. Undo the mask addition and create it from the subject selection, or correct the mask itself.
Fill a plain existing backdrop with one colour
Direct filling suits a hard-edged graphic or a backdrop that should become uniformly white, black or another solid colour. It replaces the selected pixels' tone and texture. If the existing background includes a shadow you want to keep, use the colour-adjustment route in the next section.
Create a separate XCF copy, then select the photo layer and choose Layer > Duplicate Layers. The command adds a copy of each selected layer. Keep the copy above the original in the stack, work on the copy, and retain the original as a fallback.
- Select the copy's image thumbnail. Use Fuzzy Select to select the background, with Sample merged off. Leave the subject excluded.
- For disconnected patches of the same backdrop, add each patch to the selection. Select by Color can collect matching colours across the layer, but can also collect a matching shirt, label or white highlight. Inspect the whole subject before filling.
- Choose the replacement foreground colour, then activate Tools > Paint Tools > Bucket Fill.
- In Tool Options, choose FG color fill and set Affected Area to Fill whole selection. Keep Mode at Normal and Opacity at 100%. Click inside the selected background once.
- Choose Select > None and inspect the boundary at 100% zoom. Toggle the edited copy's eye icon to compare it with the original.
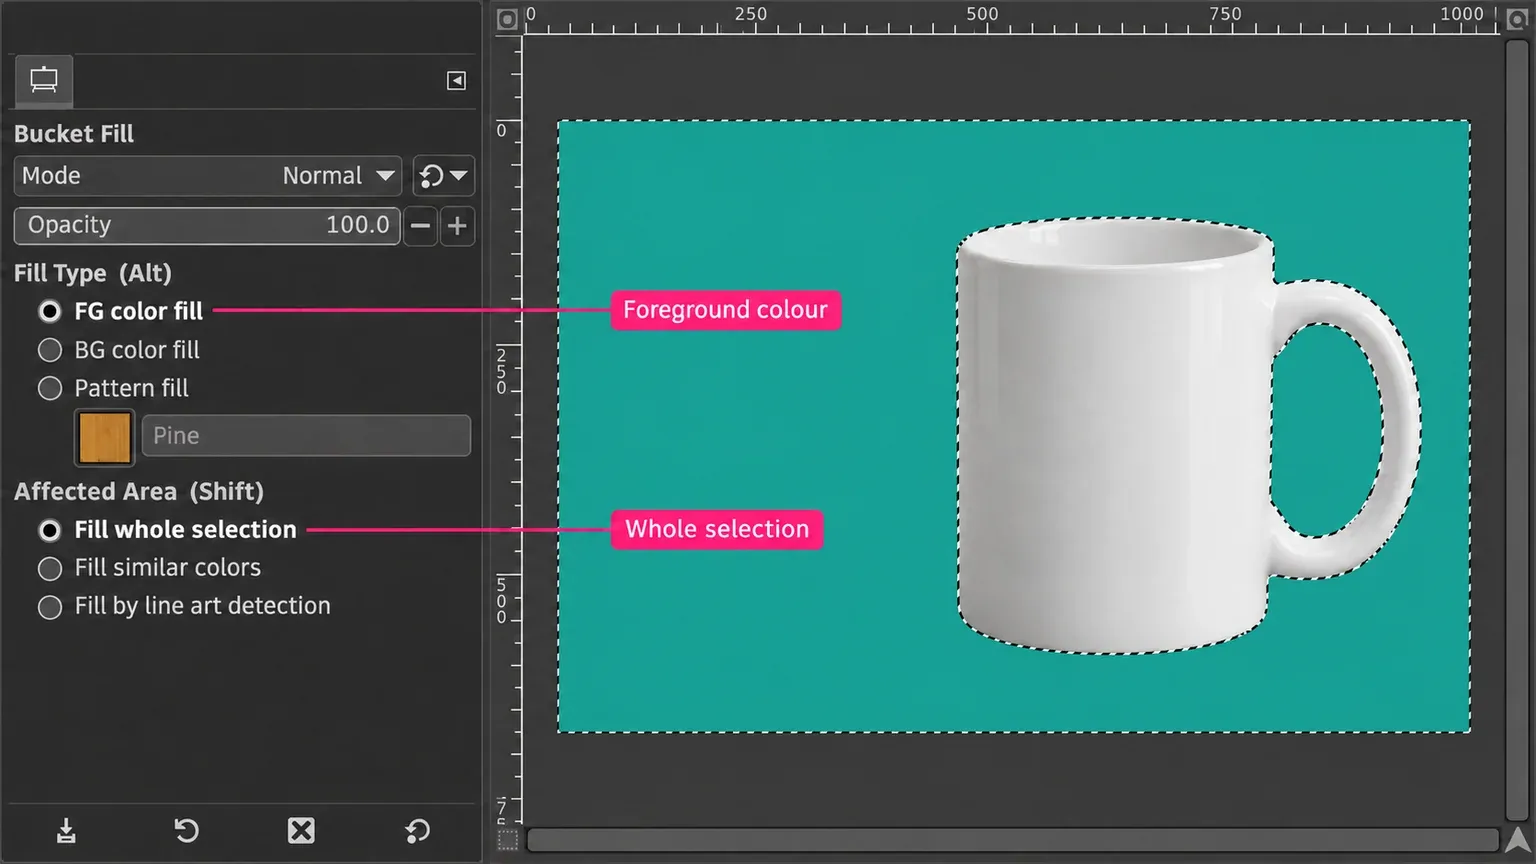
The selection limits where the fill goes. Fill whole selection fills the whole layer when no selection exists, so check the marching-ants boundary before clicking. A feathered selection produces a partial fill along its soft edge; repeatedly clicking can strengthen that fill and change the boundary.
If filling reaches into the subject, undo the fill and correct the selection. Repeated bucket clicks won't improve a boundary that includes the wrong pixels. For scanned lettering or a logo on white paper, the white-background removal method gives you more control over pale edge pixels before you add colour underneath.
Change a photographed backdrop while keeping its shading
A flat fill removes the brightness differences that describe folds, shadows and texture. I'd adjust the backdrop's colour instead when those differences belong in the finished photograph. This works best when the existing backdrop is coloured and separable from the subject; a white wall needs tinting rather than a hue rotation.
- Duplicate the photo layer and select the backdrop on the copy, excluding the subject. Check the interior gaps as well as the outer boundary.
- Choose Colors > Hue-Saturation…. Start with Master and move Hue while watching the preview.
- Adjust Saturation as needed. Keep Lightness restrained so the original shading remains useful. Compare the shadow and highlight areas before accepting the adjustment.
- Clear the selection and compare the edited copy with the original. Repair the selection if the subject's colour changed at its boundary.
Hue-Saturation acts on the selected area or active layer. Its named colour ranges identify colours, rather than objects: choosing Reds doesn't protect a red shirt from a red backdrop. The spatial selection supplies that protection. Hue-Saturation is unavailable in a Grayscale image; use Image > Mode > RGB before a colour edit.
For a neutral backdrop, use Colors > Colorize… on the selected background. Its Color button sets the tint and updates the Hue, Saturation and Lightness controls. Adjust Lightness if the original is too close to white or black for the tint to show. Judge the result by the retained shading, rather than expecting every pixel to match a flat colour swatch.
For a wider colour replacement, including objects and several hue ranges, use replacing one colour with another in GIMP. That is a different job from creating a uniform backdrop behind a cut-out subject.
Repair the edge and diagnose a fill that doesn't show
Check a masked subject over both a light and a dark temporary background. The light background exposes dark remnants; the dark background exposes pale fringes left from the original backdrop. Then return to the intended colour and judge the picture at its delivery size.
For a silhouette error, click the mask thumbnail and paint black to hide unwanted pixels or white to restore part of the subject. The selected mask thumbnail has a border showing that the mask is the editing target. Clear any selection first so it doesn't constrain the brush. Keep edge corrections local: a broad blur can soften hair and product outlines that were already correct.
A pale fringe can also be colour from the original backdrop inside partially transparent edge pixels. Tightening the mask may help a hard contour, but can also remove fine detail. For a plain white surround, work on a copy within a background selection. If the copy lacks an alpha channel, add one with Layer > Transparency > Add Alpha Channel, then consider Colors > Color to Alpha…. The filter can remove the chosen colour from the whole layer or selection, including wanted white areas if you leave them exposed. Keep the white-background removal guide's subject-protection steps in place.
| What you see | Check | Action |
|---|---|---|
| The new colour hides the subject | The filled layer is above the subject. | Move the fill below the subject layer. |
| The old background still covers the colour | The photo or another layer above the fill is opaque. | Finish the subject mask and hide unused opaque originals. |
| Only part of the background changes | A selection remains, or the fill layer is smaller than the canvas. | Clear the selection; check the fill layer's dimensions and position. |
| The fill does nothing on transparent areas | Lock alpha is enabled. | Disable Lock alpha on the fill layer before filling. |
| The mask changes instead of the colour | The mask thumbnail is selected. | Undo, then select the intended colour layer's image thumbnail. |
| The colour looks faint or blends with another layer | Layer Mode, layer Opacity, tool opacity or a parent group is affecting it. | Use Normal and 100% for a solid fill; check the containing group too. |
The Layers dock shows visibility, opacity, modes and locks. Check the exact layer before changing those controls. With nested layers, a parent group's visibility or opacity also affects what you see.
Start a new image with a coloured background
Set the foreground swatch to the intended colour, then choose File > New…. Enter the required dimensions and expand Advanced Options. Under Fill with, choose Foreground color, then create the image.
The New Image dialog also offers Background color, White and Transparency. Choose Transparency if you want to build the backdrop separately. Changing the Toolbox swatch later still requires a fill to change existing pixels.
Put a coloured rectangle behind editable text
For a caption, create a new layer with Fill with: Transparency, then move it below the text layer and above the photo. With that new layer selected, use Tools > Selection Tools > Rectangle Select to draw the backing rectangle, choose its colour, and use Edit > Fill with FG Color. Clear the selection afterwards.
Rectangle Select defines the area to fill. Keep the text and its backing on separate layers so you can edit the words. In this method the rectangle's size is independent of the text; adjust it separately when the caption changes.
Change the window surround without changing the picture
Use View > Padding Color > Custom Color… for the area around the canvas. Padding Color has no effect on the image itself, so it won't make an exported transparent PNG white or turn an image background black. Use a visible colour layer for those results.
Keep the editable XCF and check the exported colour
Save the layered project as XCF before exporting. XCF retains layers and the rest of the working image structure; undo history isn't saved with it. Keep the mask and colour layer separate so both remain available when the backdrop changes again.
Leave the intended colour layer visible and choose File > Export As…. PNG is useful for logos, text and flat graphics; JPEG suits photographic images with an opaque backdrop. GIMP's web-image guidance distinguishes PNG's lossless edges from JPEG's photographic compression. A full-canvas opaque colour layer supplies the actual background in either export.
Open the exported file and inspect the corners, enclosed gaps and subject edge. For a transparent delivery copy, hide the colour layer first and use the transparent PNG export steps. Keep the XCF as the version you return to for the next edit.

Elena Morris
Elena Morris is the GIMP image-editing and compositing editor at TheGIMP.net. She writes about selections, masks and layers, restrained retouching, compositing and export.